# Files management
# File filter
When there are a lot of files, it becomes difficult to find what you need just by browsing the folders. For convenience, you have the function to search for desired files using filters.
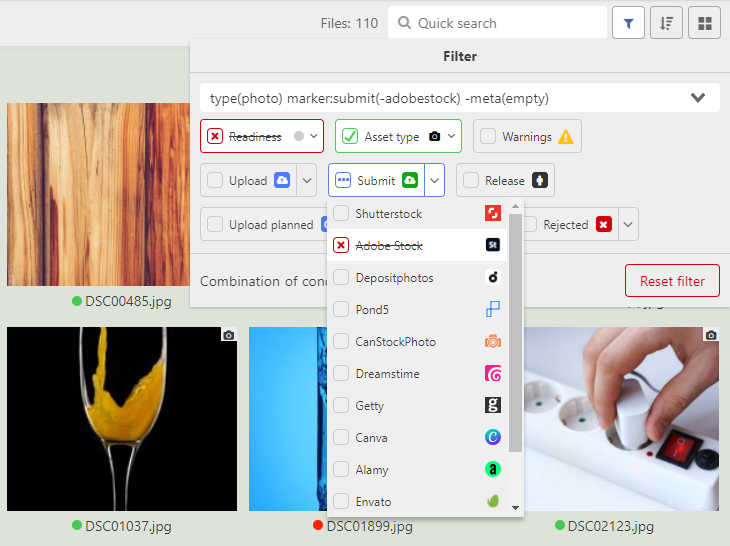
You can filter files by:
Readiness state:
empty (
meta(empty)) - the file has no title, no description, no keywordsnot ready (
meta(error)) - at least one of the metadata fields is filled, but the file does not satisfy all the rules for checking metadata (you can set them yourself inSettings -> General)done (
meta(ok)) - all necessary metadata is filled in, the file is ready to be uploaded.
File type:
Photo (
type(photo)) - the file type is "Photo"Illustration (
type(illustration)) - the file type is "Illustration"Vector (
type(vector)) - the file type is "Vector"Video (
type(video)) - the file type is "Video"Source (
type(source)) - the file type is "Source"Release (
type(release)) - file is of type "Release"
Presence of warnings (
warn). You can define the list of warnings throughSettings -> GeneralStatus (
marker:status_name). You can select files that contain or do not contain a particular status. For example, uploaded to at least one microstock agency, or to certain agencies.
By clicking first time on the filter button it becomes active and only files that meet its condition will be visible. By second click on filter button files that contradict its conditions become visible. And the third click makes button deactivated. When you click while Ctrl key is pressed states of button will be changed in oposite direction.
In addition to selecting one search criterion, you can select several filters at once. You can specify how they will be combined:
Any of - the file must match at least one of the active filters. For example, you can select files with empty and partially filled metadata
or(meta:empty meta:error)All - the file must match all active filters at the same time. Let's say you can select files that are ready but contain warnings
meta:ok warnAll not - the opposite of "All".

For convenience, the filter can be set not only using the buttons, but also by manually entering text value into a special bar. Smart search remembers the last used filters and offers only what you need.
To reset all filters, you can simply clear the search field or click on the appropriate button.
# Search and replace metadata
In addition to the quick search, ImStocker Studio has an advanced search function. It is activated by pressing the button with the binoculars icon (1)
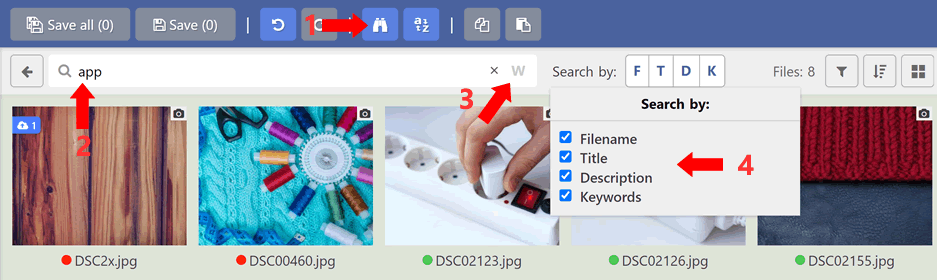
A search string is entered in field (2)
Button (3) allows you to turn on and off the search for whole words
Block (4) allows you to configure where the search will be performed: in file name, in title, in description or in keywords
Next to the button for the advanced search function, there is a button for activating the replace function (1):
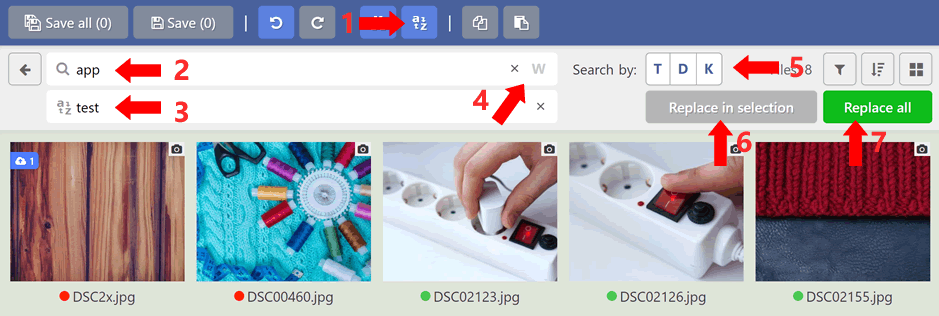
In field (2) the search text is entered, in field (3) - the text with which you want to replace the search
Button (4) allows you to enable or disable the search for entire words
Block (5) allows you to configure where the search and replacement will be carried out: in the title, in the description or in keywords
Button (6) replaces only inside selected files, button (7) - in all found files
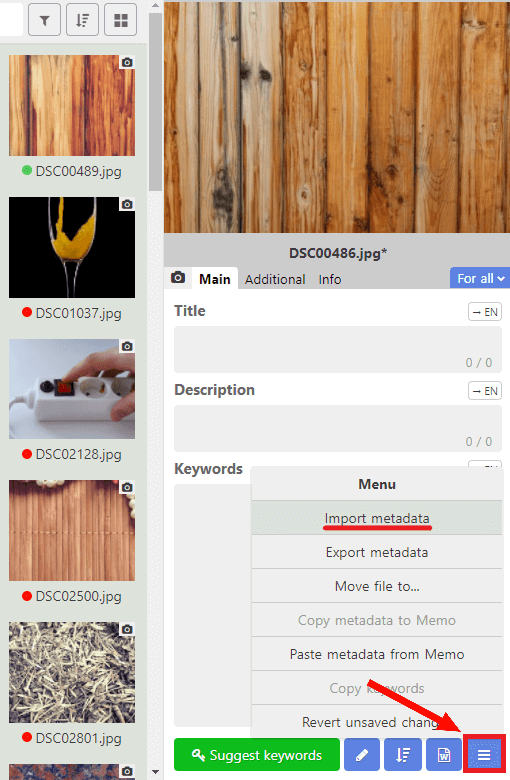
# Import and export metadata
Metadata import allows you to quickly load metadata from a CSV file into selected files.
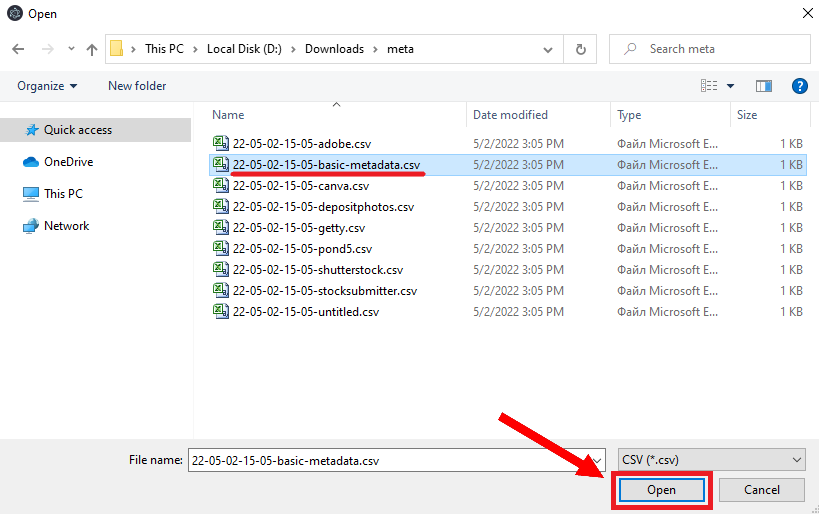
To use: select the files for which you have prepared a .csv file and press Menu -> Import metadata. Matching rows of CSV with selected files is carried out by filenames
Select the .csv file and click Open:
Based on the metadata contained in the file, the program will try to determine the template for the data to be filled in and offer it. Click Import:
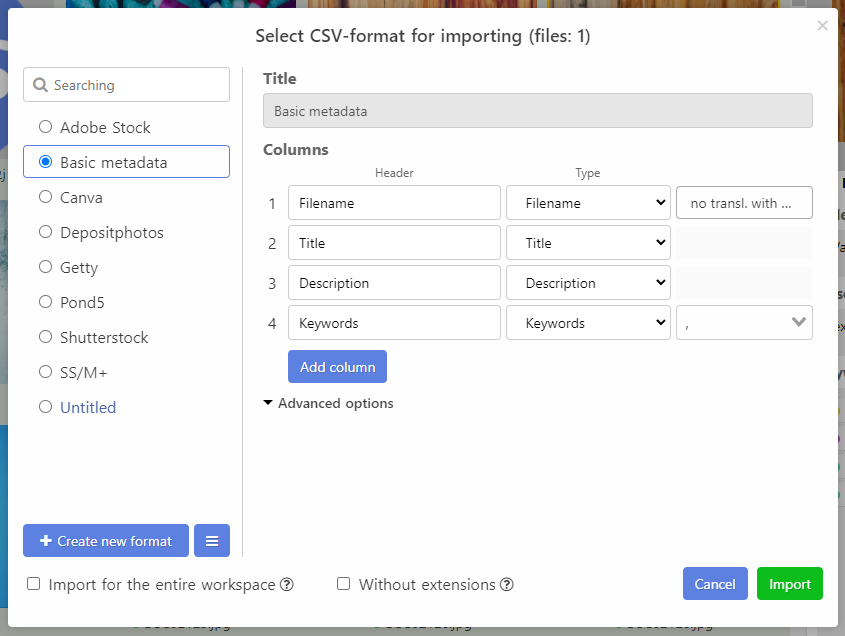
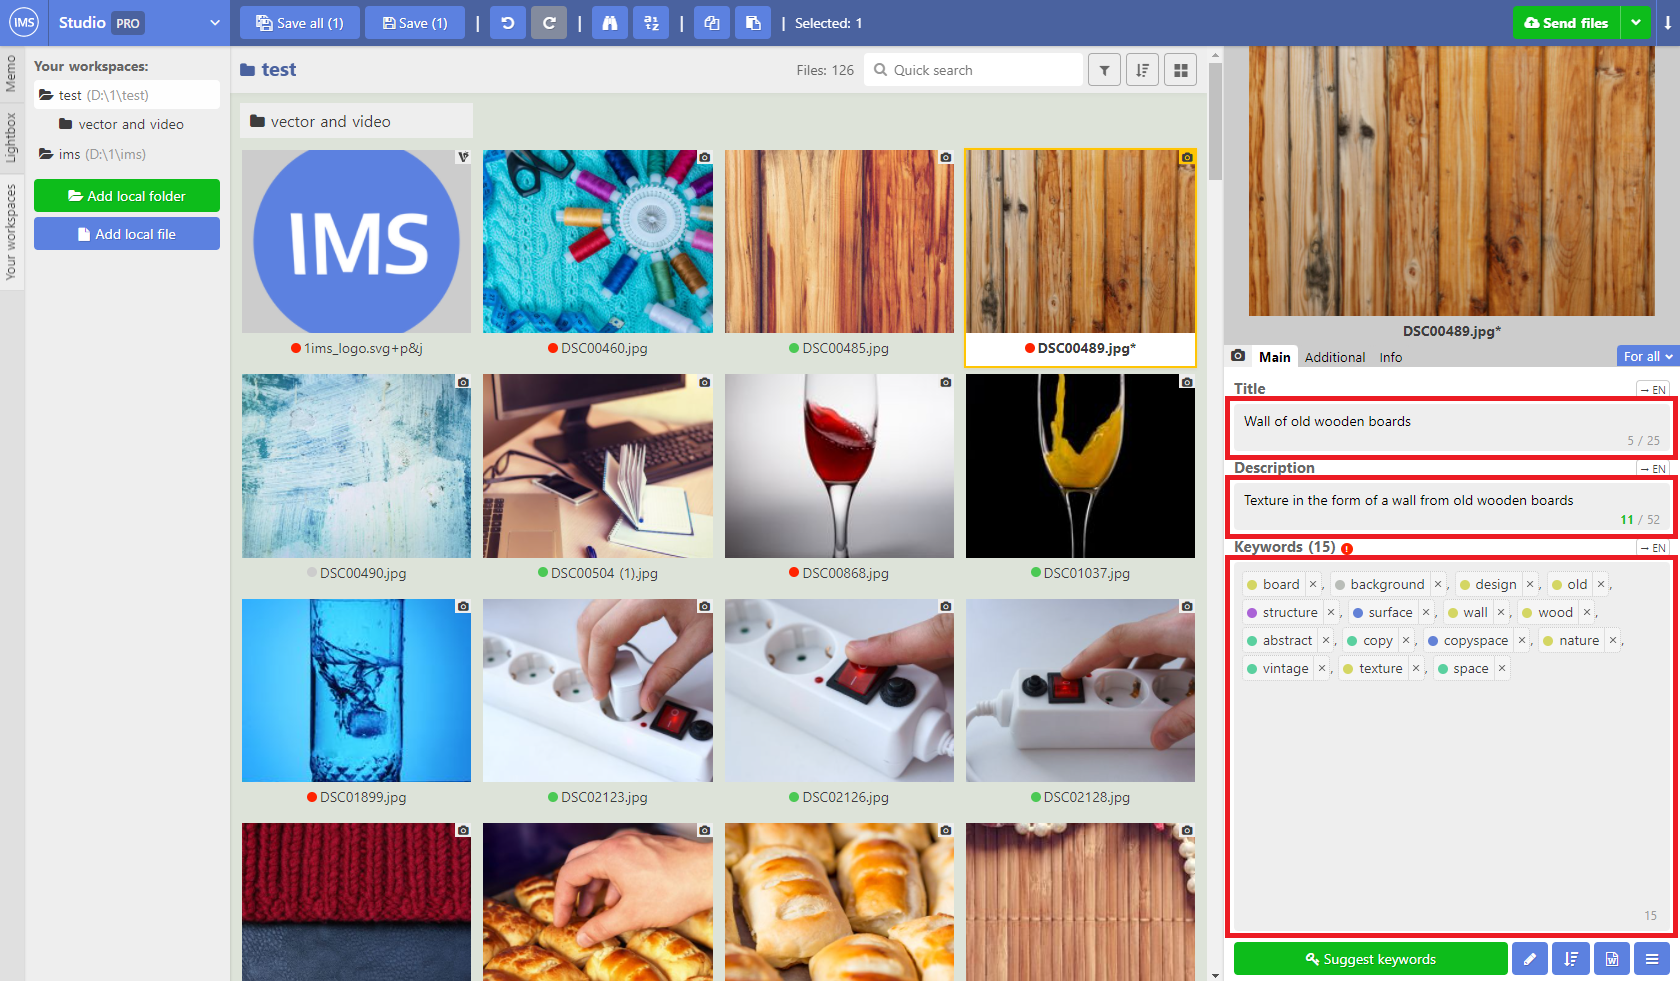
All imported metadata fields are filled for each of the images mentioned in the file:
If the checkbox "Import for the entire workspace" was enabled, then the import will be performed for all files located in the same folder as the selected files
Metadata export function allows, on the contrary, to generate CSV files containing the metadata of the selected files. You can read more about this feature here
# Metadata analysis
Metadata analysis allows you to evaluate how diverse the metadata of your files is. In order to analyze the metadata, select 2 or more files in the workspace and press the Analyze button, which will appear in the Keywords field.
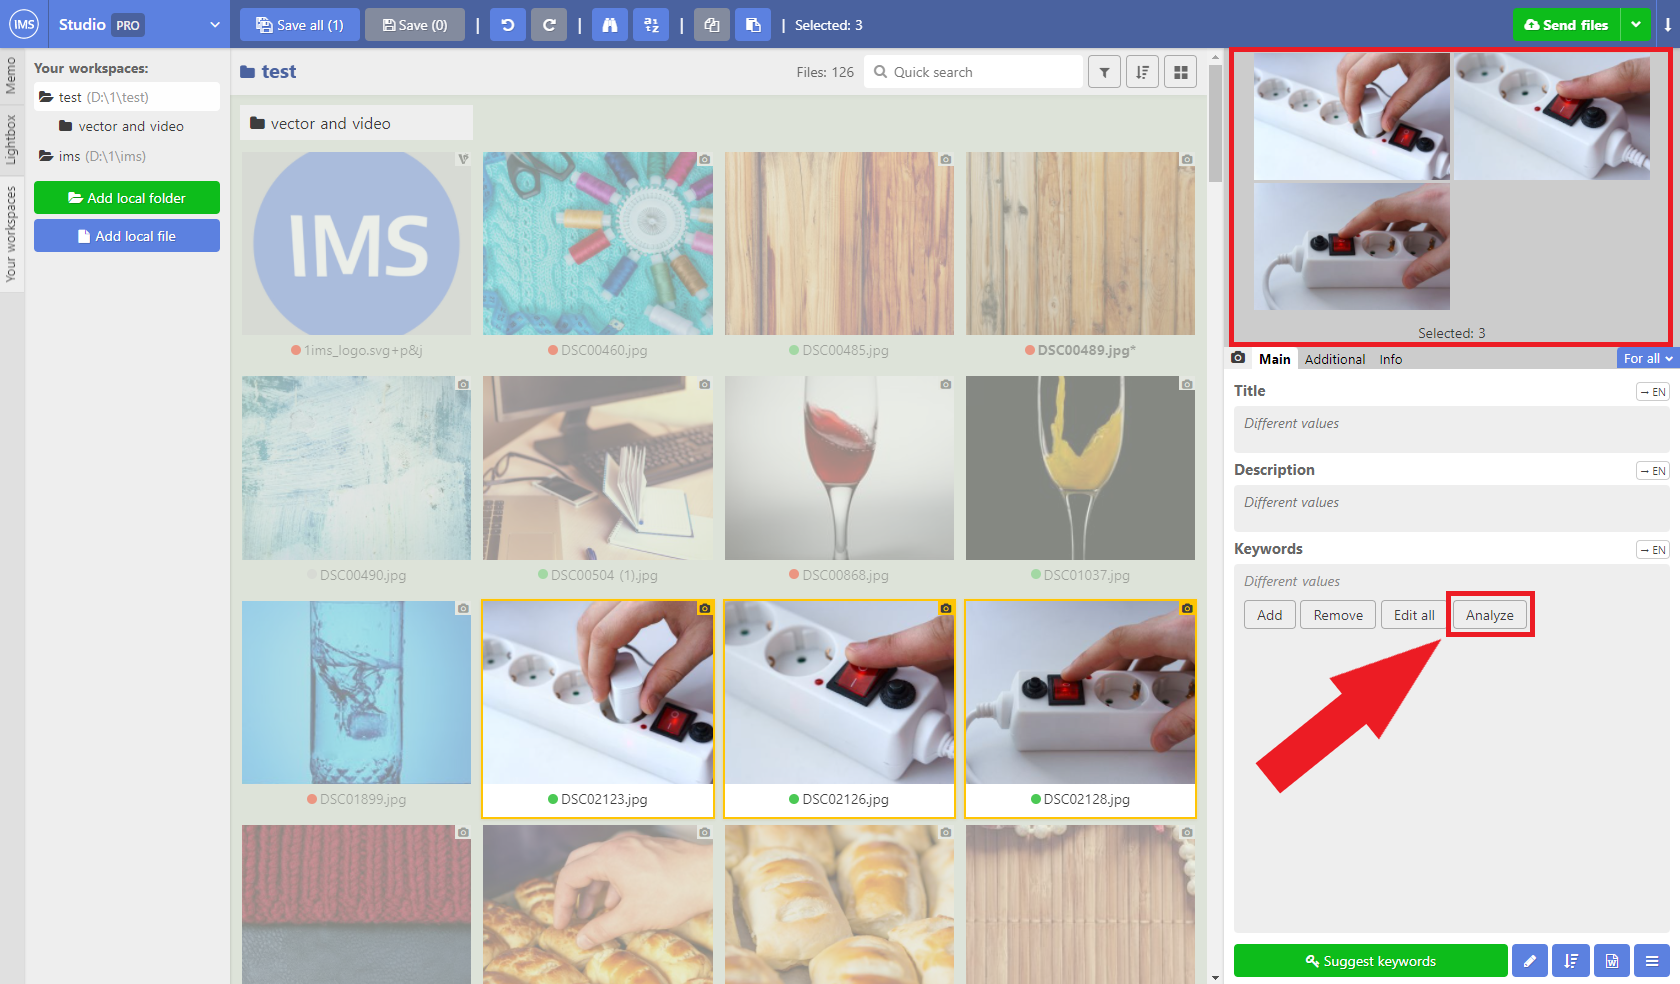
The Metadata Analysis window will open, containing two tabs:
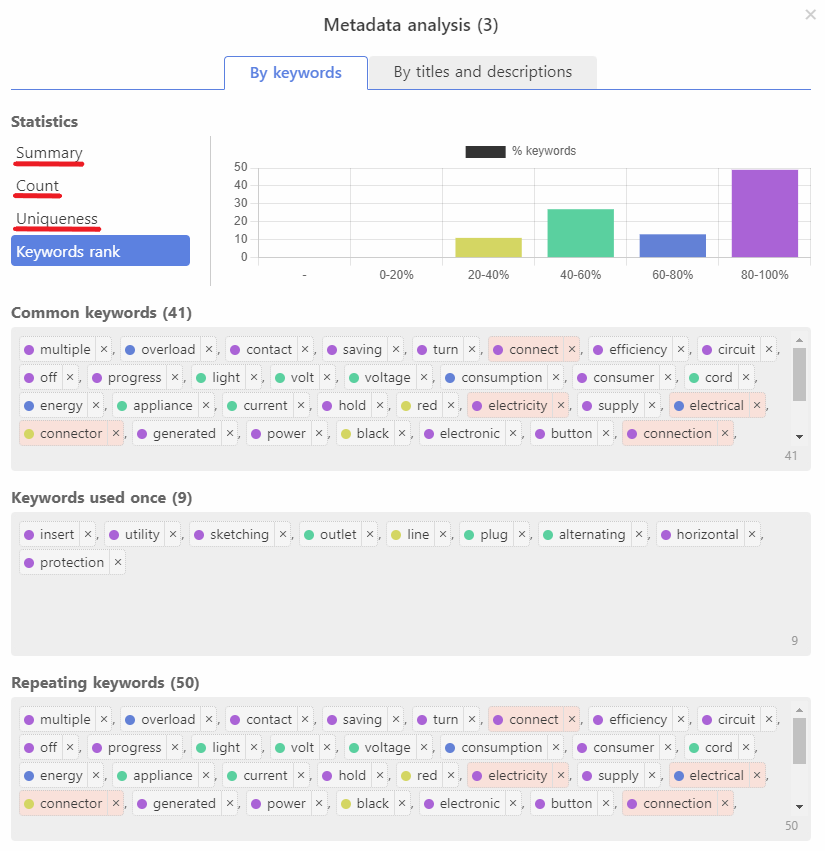
By keywords - the program will provide a brief statistical summary of 4 points: the minimum number of words, the maximum number of words, the average number of words and their average uniqueness. It will visually display the number of keywords for each of the selected files, their uniqueness as a percentage of the total number of words, and divide the words into ranking groups, as well as calculate their number. Common keywords, words used only once, repeated words, as well as a general list of all words will be visually displayed in special boxes.

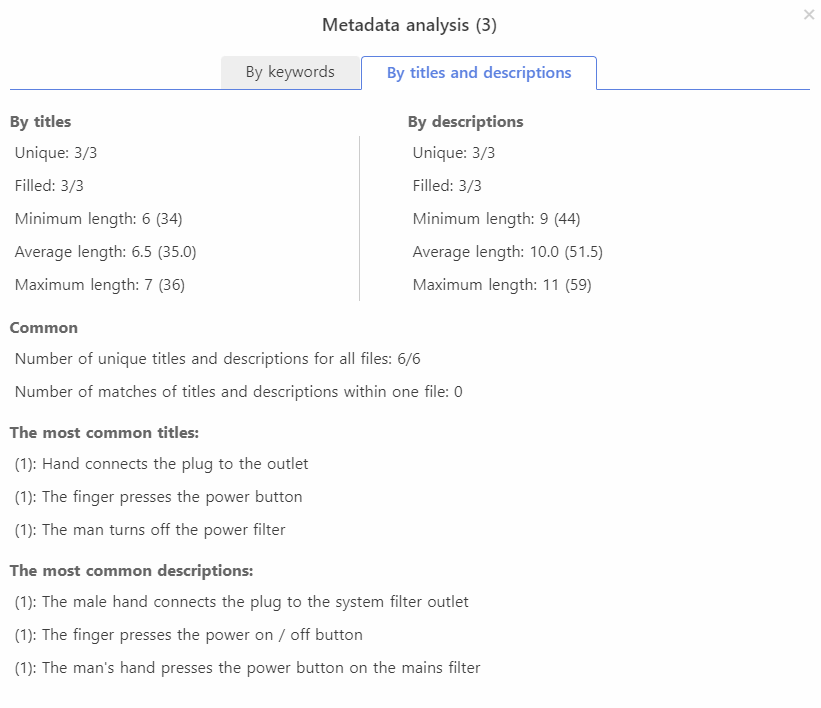
By titles and descriptions - the program will display the number of unique and completed, minimum, average and maximum length, the total number of unique and matching titles and descriptions of each of the selected files. Provides lists of the most common titles and descriptions.
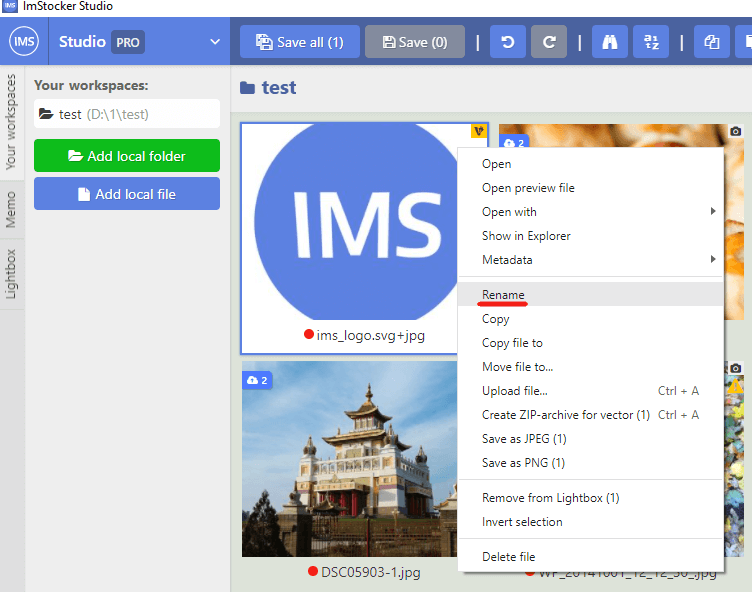
# Renaming files
The ImStocker Studio program allows you to rename a file without leaving the program. To do this, right-click on the file in the workspace and select Rename:
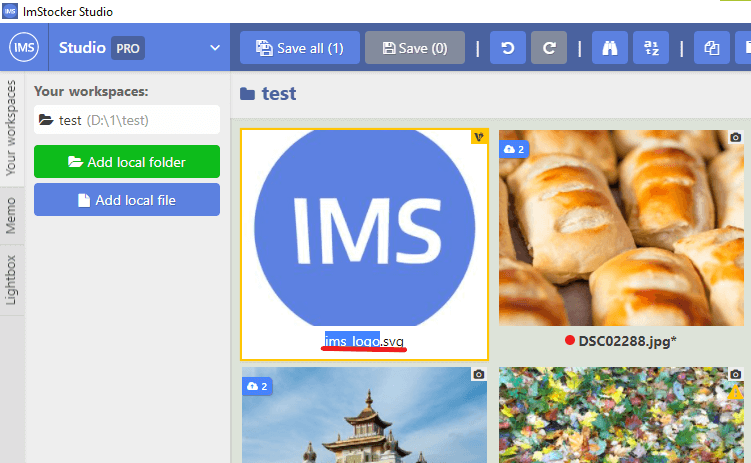
Or double-click on the image name with the left mouse button:
TIP
You can rename files by theirs titles and descriptions. Read more here
# Copy files
You can copy files without leaving the program. To do this, select a file and find the Copy file to item in the context menu.
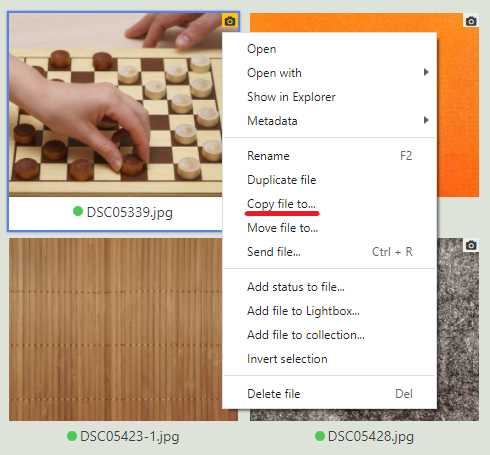
A dialog window will open with a suggested name for the copied file.

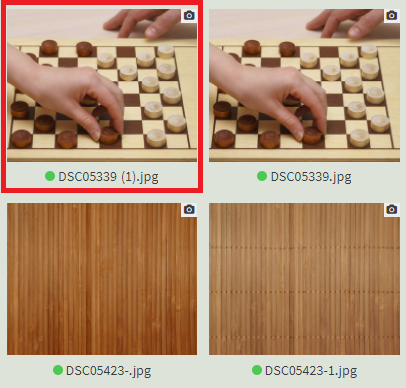
Copying completed.
TIP
The "Duplicate" command allows you to make a copy of file (or files) inside the current folder
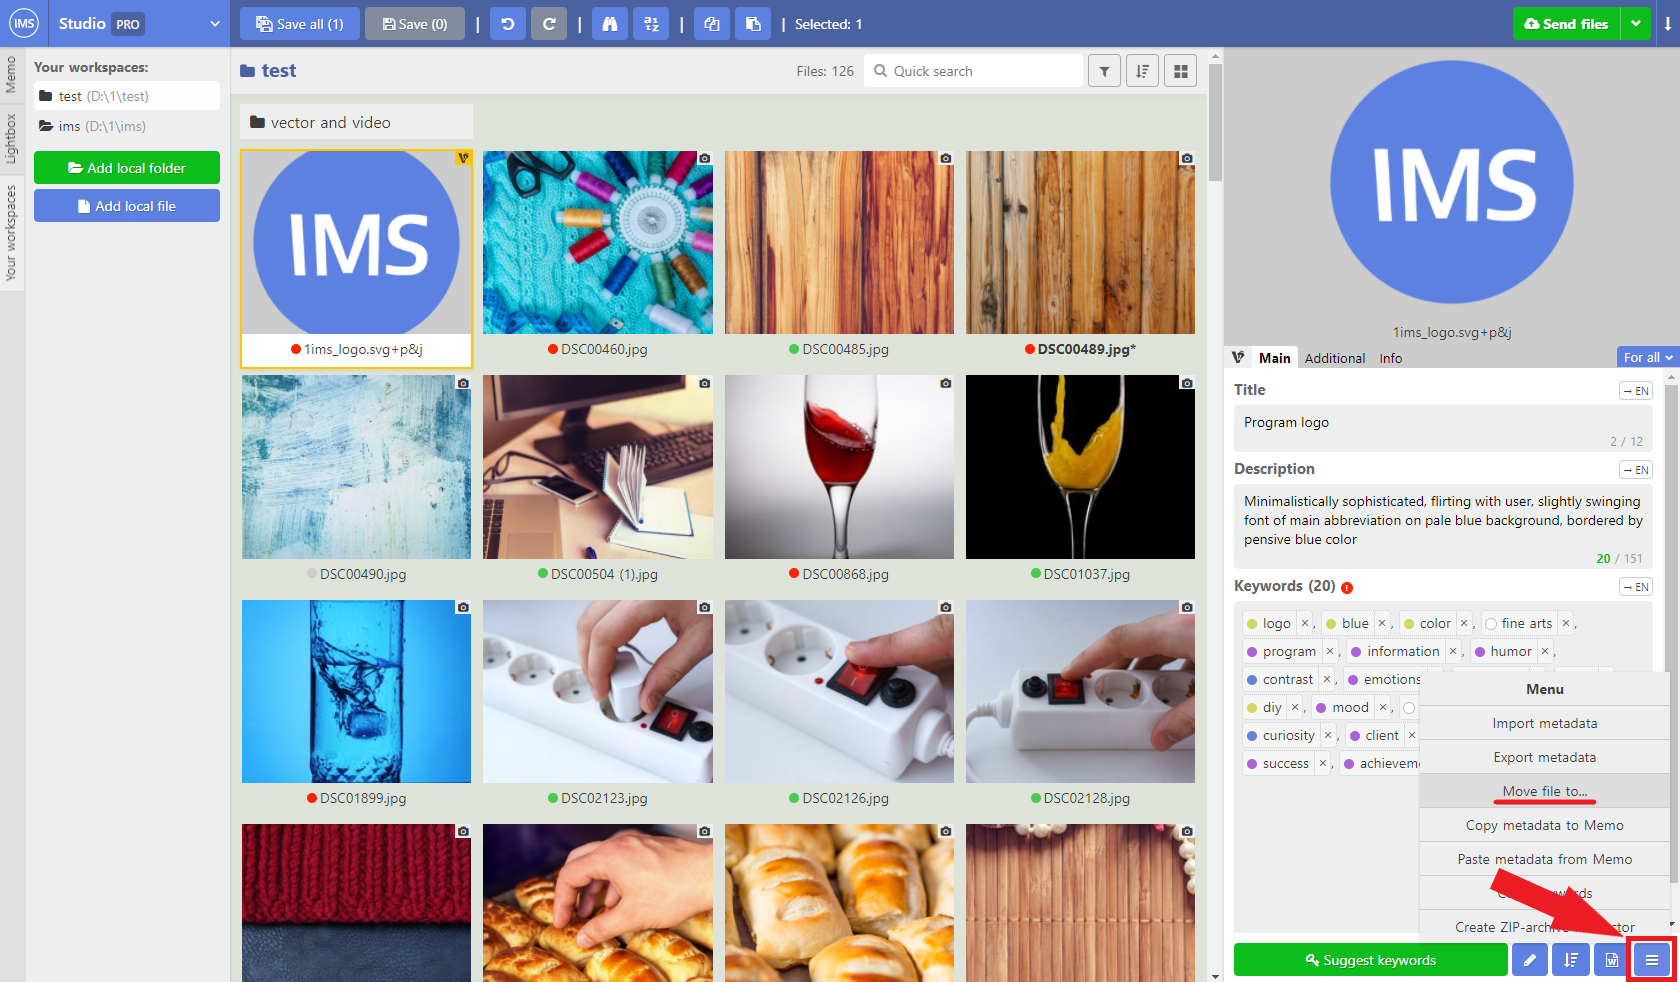
# Moving files
The ImStocker Studio program also allows you to move a file without leaving the program. To do this, right-click on the file in the workspace and select Move file to:
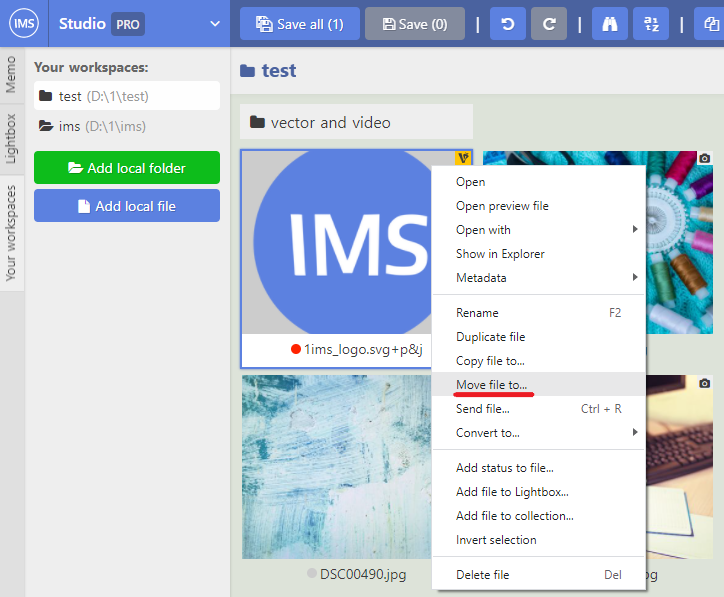
Or select the necessary pictures to move and use the Menu button in the lower right corner of the program, then click Move file to:
# Open file in external program
If you need to correct or view the file in any external program, you can click the “Open with...” item in the context menu
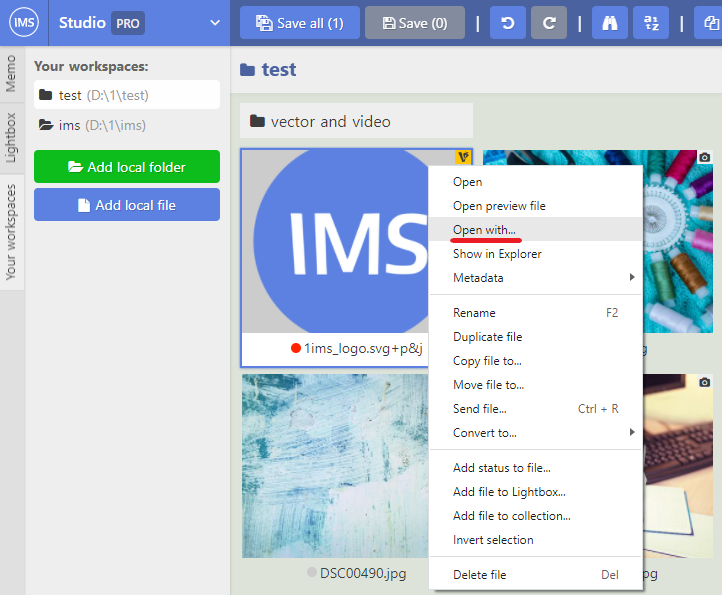
If the clicked asset includes several files at once (for example, EPS + JPEG), then the program will ask what file you want to open.
Next, the program will show application select dialog. Find the desired program on your computer and confirm your choice. After that, ImStocker Studio will ask if it should remember this program for the selected file extension. If you answer yes, then the next time the corresponding item will appear in the context menu:
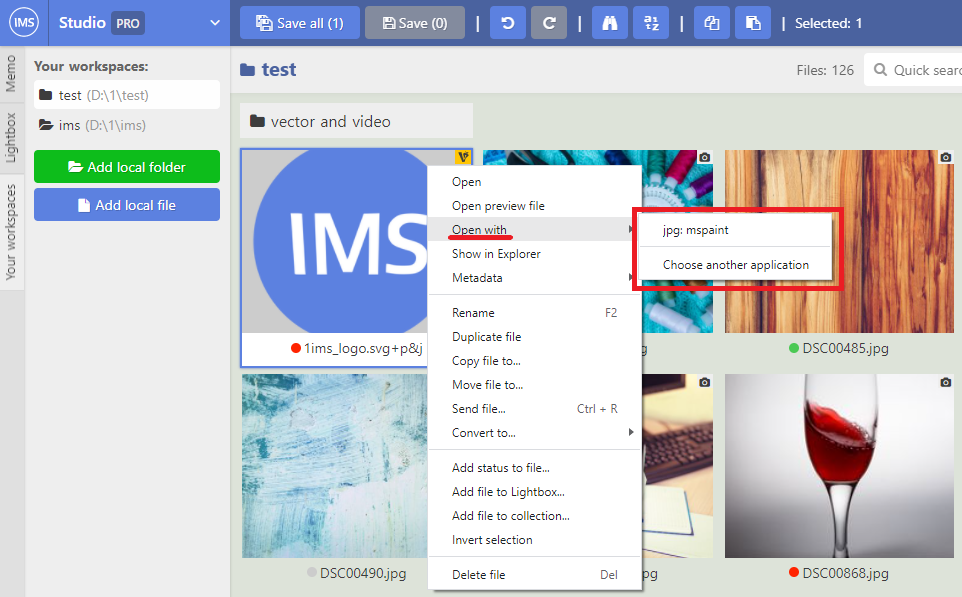
TIP
Using this function you can run batch scripts to process files
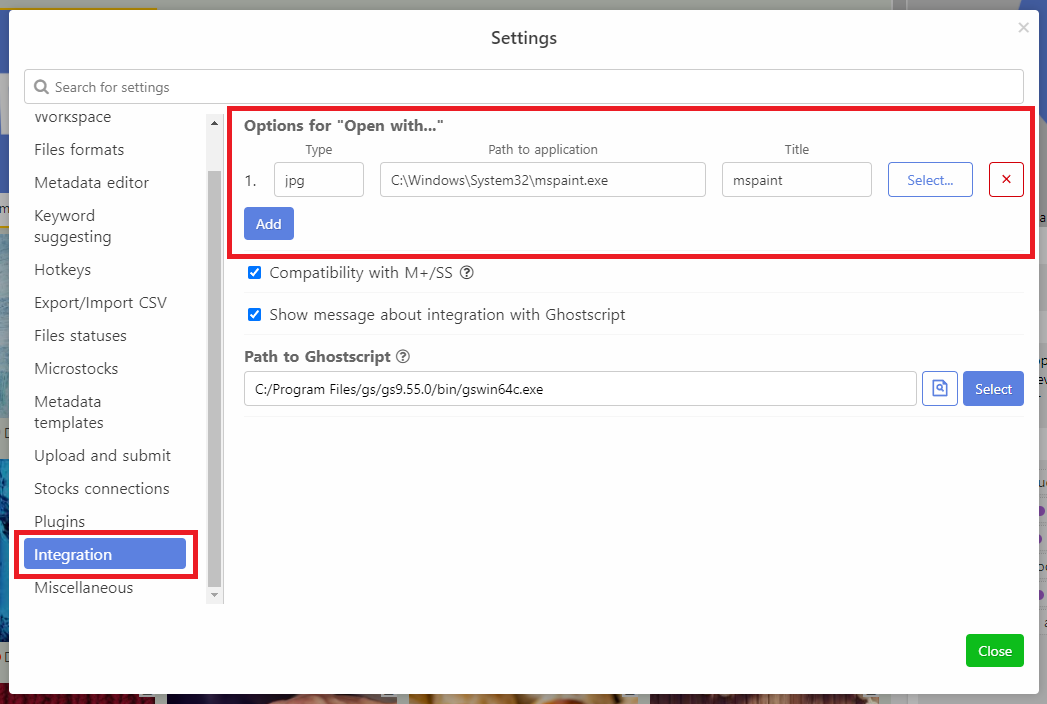
You can also edit the list of external programs in the Settings - Integration - Open with section:
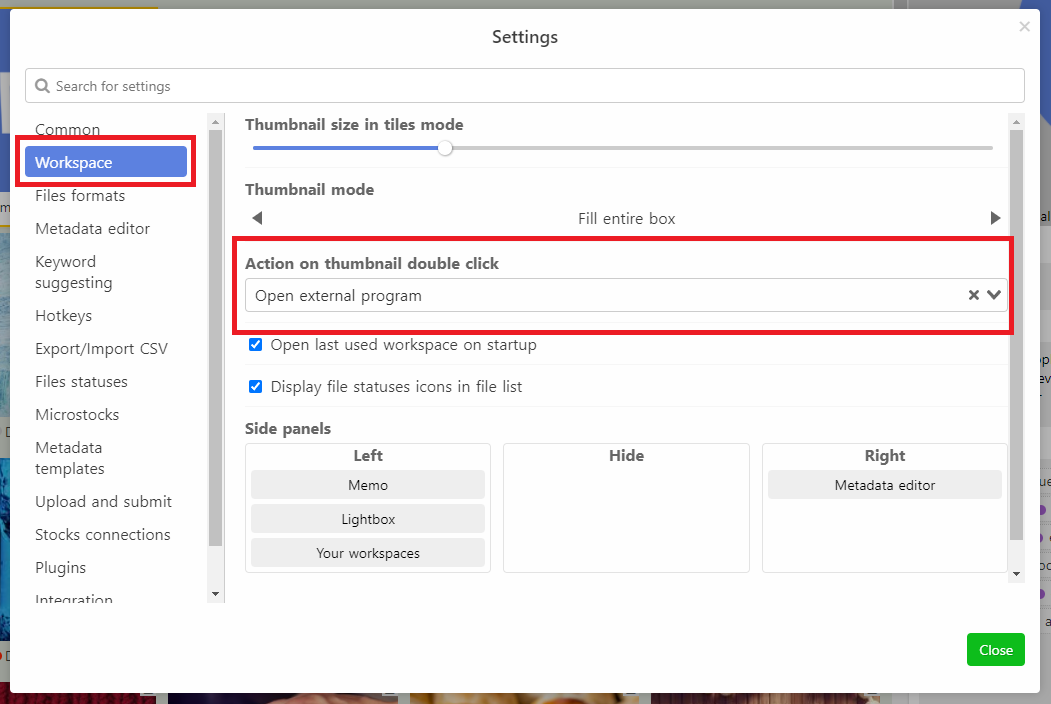
You can configure the opening of an external program by double-click on a tile. To do this, select the appropriate option in the item “Action on thumbnail double click”:
Now double-clicking on a tile will open the first matching extension from the Options for “Open With...” list. If you have several programs selected for one extension, you can swap them by dragging the item number in this list.
# Working with individual files
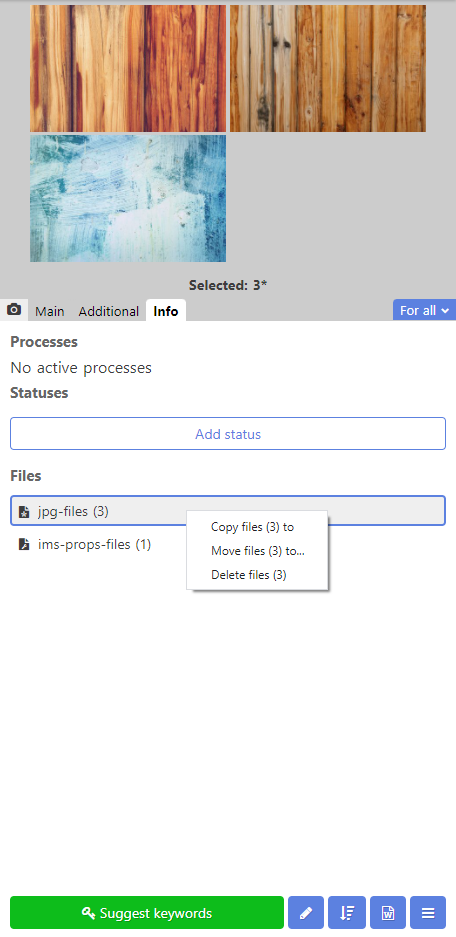
The Metadata Editor -> Info tab consists of 3 sections: Processes, Statuses and Files.
In the Processes section you can manage uploads and submissions to microstocks. More
In the Statuses section, you can add and remove statuses for one or many files at once
In Files, in addition to showing the files included in the combined group (asset), there is functionality that can be used using the context menu. The following functions are available: copy, open, rename, move, show in explorer and delete. They can be activated both for one file and for many at once (both the selection of several files within one asswet is supported, as well as multiple files with the same extension among several assets).
# Working with folders
To rename a folder, right-click on the folder and select Rename folder:
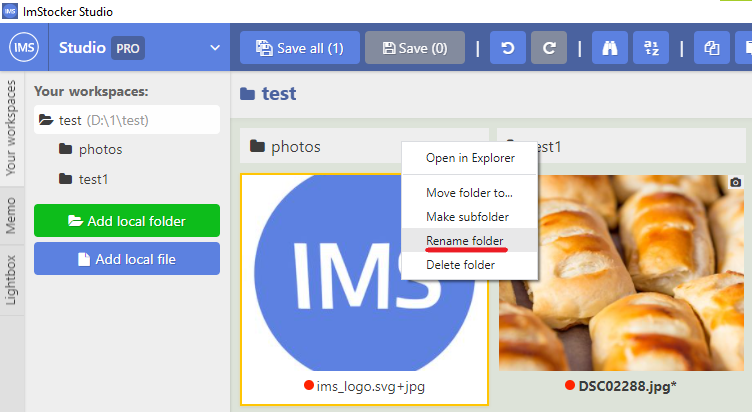
A rename window will open, allowing you to give the folder a new name:

To move a folder, right-click on the folder and select Move folder:
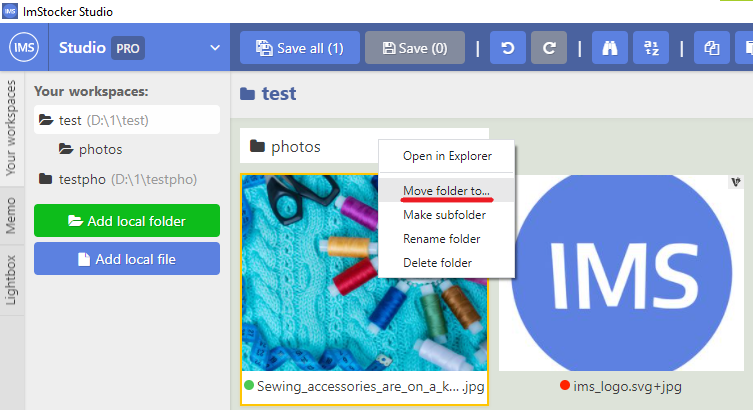
In any case, a move window will open, allowing you to Move the selected pictures or folder to one of the added workspaces, or to a folder created inside them:

To create a subfolder, right-click on the folder and select Create subfolder:
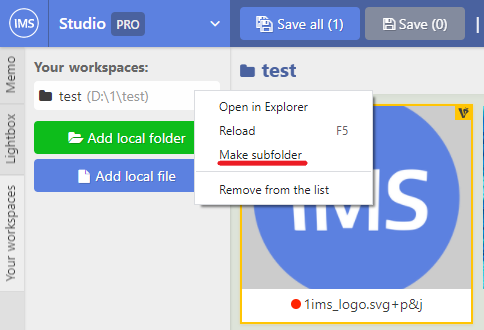
A window will open to select the name of the new folder:

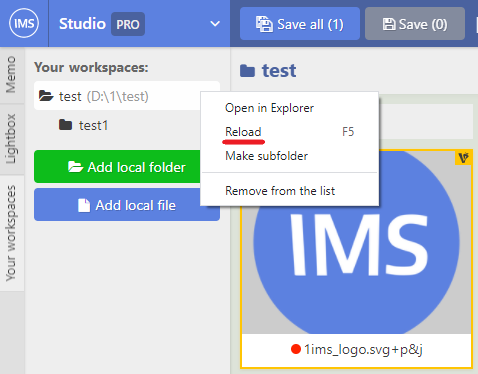
The subfolder may not appear immediately. To update the list of folders, in Workspaces you need to right-click on the folder and select Reload:
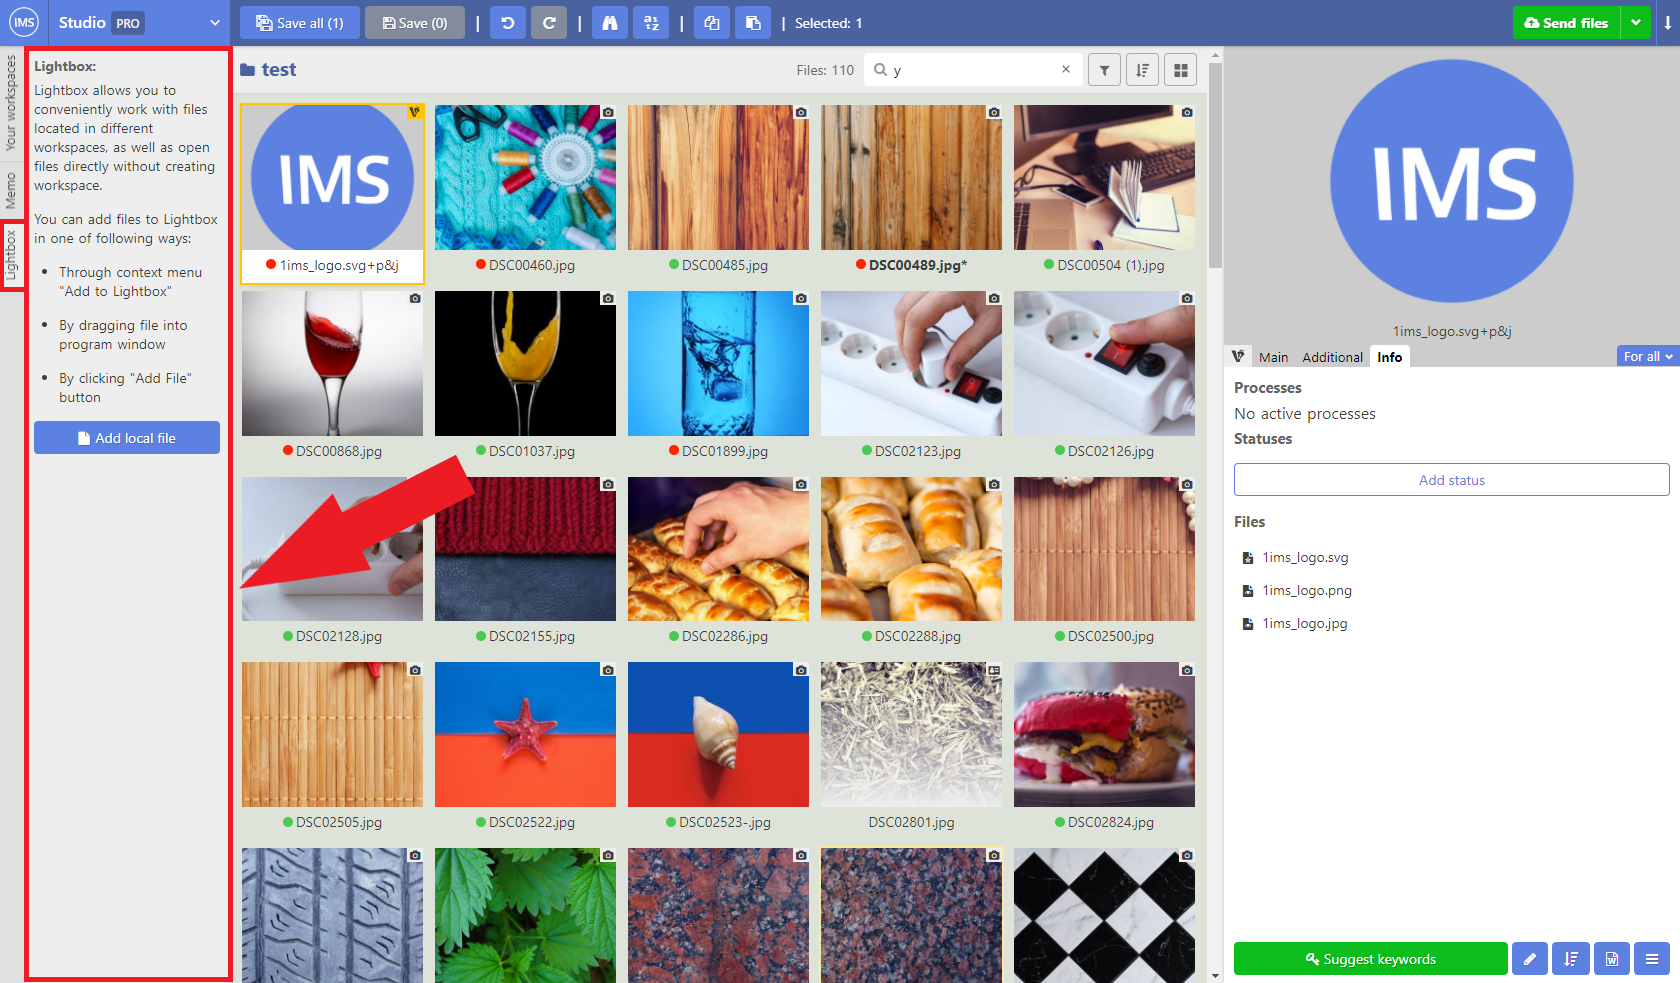
# Lightbox
Lightbox allows you to conveniently work with files located in different workspaces, as well as open files directly without creating a workspace. You can add files to Lightbox in one of the following ways:
1 - Via context menu "Add to Lightbox"
2 - By dragging the file into the program window"
3 - Clicking the "Add file" button
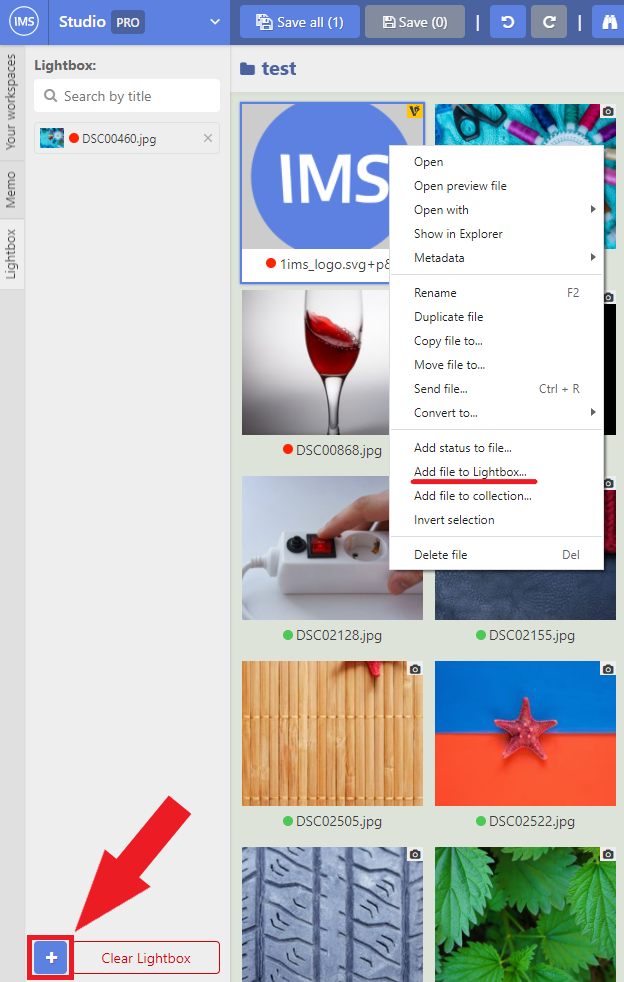
You can add files to Lightbox from your computer by clicking on the + in the lower left corner of the Lightbox, and from workspaces, to do this, right-click on the file and select Add to lightbox:
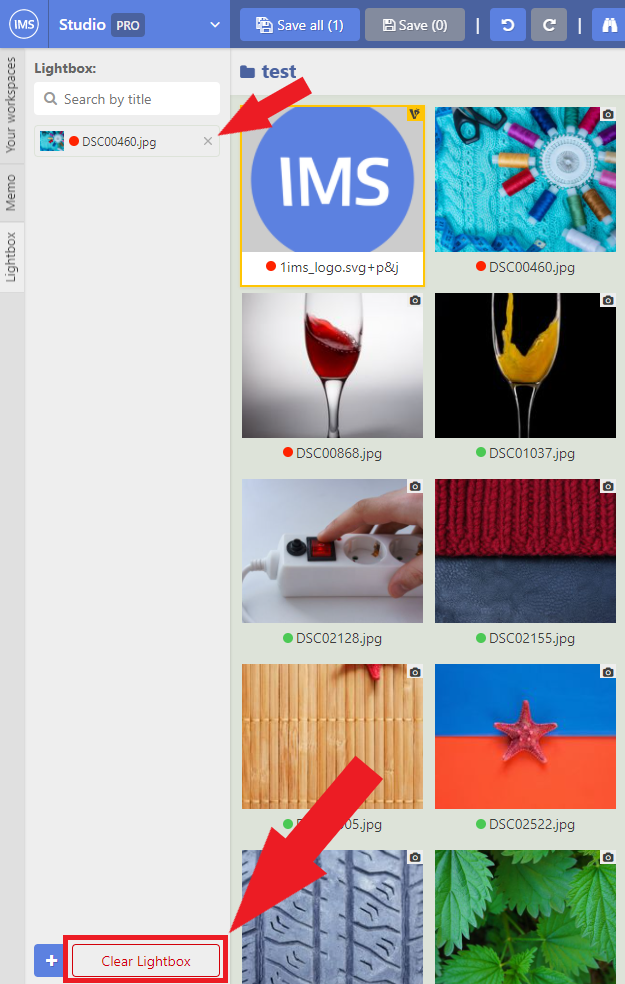
The file will appear in the Lightbox. You can delete the file using the cross on the right, or clear the Lightbox using the Clear Lightbox button in the lower right corner of the Lightbox:
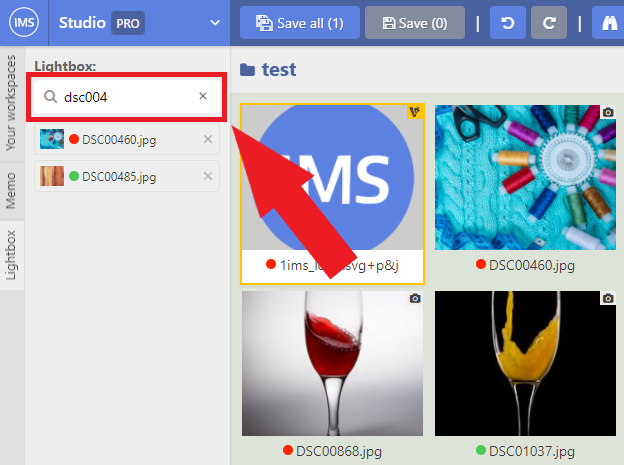
You can quickly find the desired file using the search bar:
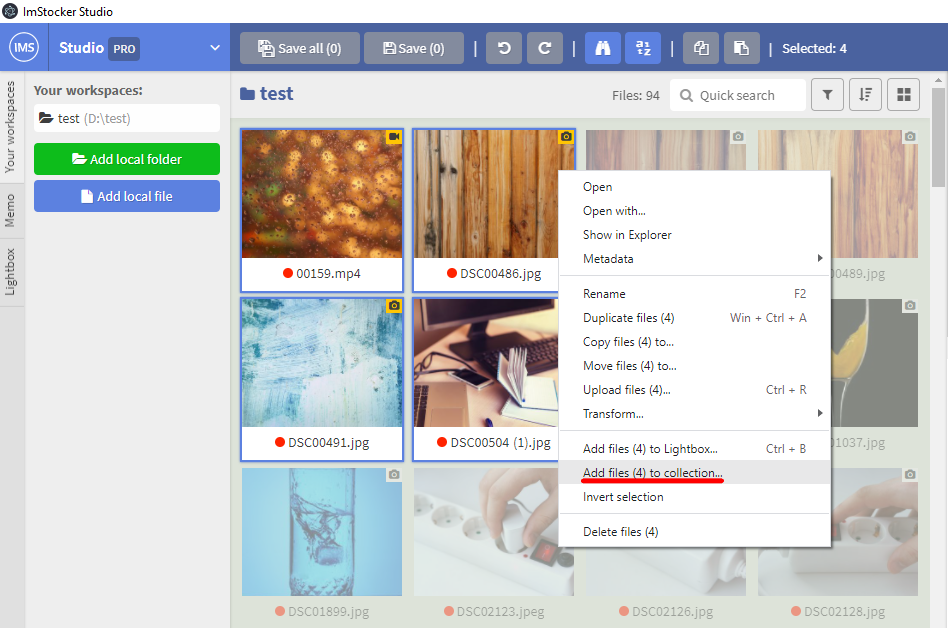
# Collections of files
Collections are folders that exist only in the program. They do not take up much space, since they do not contain the files themselves, but links to them. With them, you can group files as you like (for example, favorite files, with a certain status, uploaded to certain stocks or dedicated to a common topic).
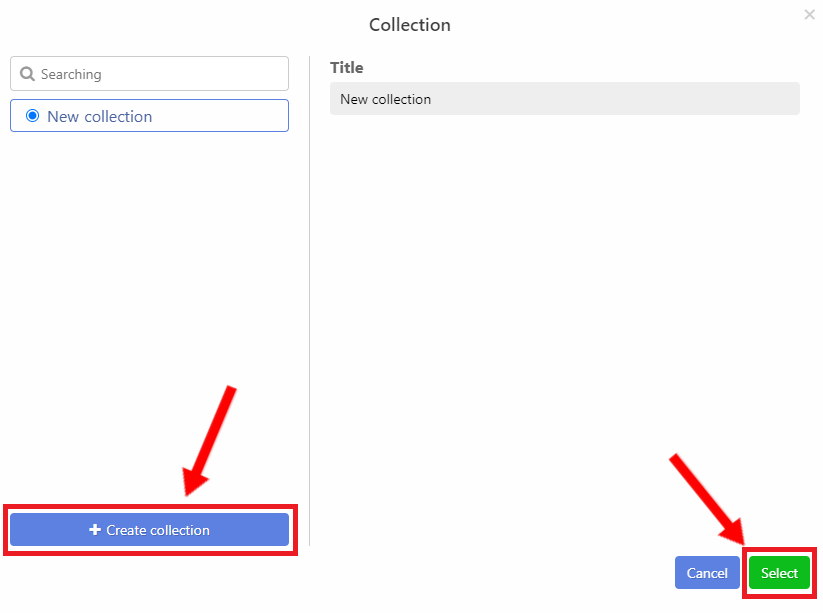
To create a collection, you need to select a file(s) and click on Add file to collection in the context menu. Enter a name for the new collection in the pop-up dialog.

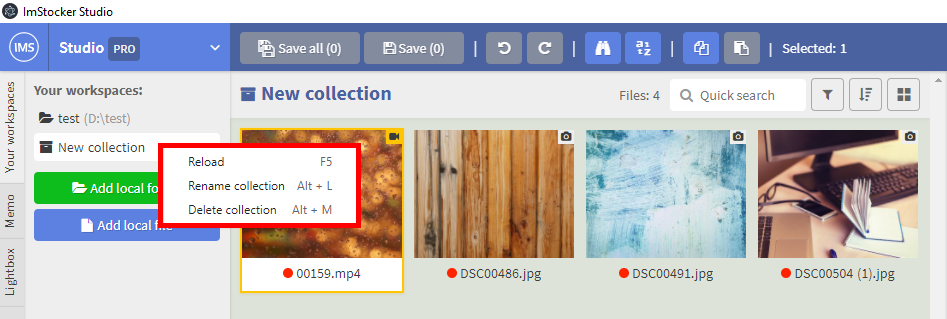
Collections can be managed in workspaces panel. Unlike folders, they are shown with box icon. Right-clicking on a collection will open a context menu where you can reload, rename, or delete the collection.
After creating a collection, new options appear in the context menu. The secondary list shows the most recently used collections first. When you click on any of them, the selected files will quickly fall into the desired collection.
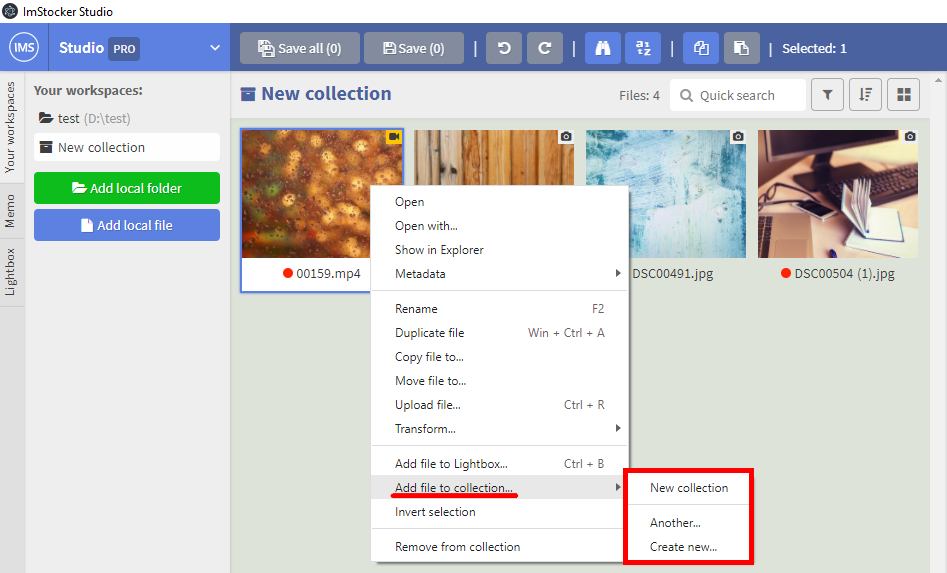
If the list does not contain the required collection, you can click on the item Other. A dialog will open where you can quickly find the required collection using the search bar, and by clicking on OK the files will be placed in the collection.
WARNING
It is important to note that files are linked to collections by their path on your disk. If you move them outside the program, they will be lost. The good news is that if you move files using our program, the links will be automatically updated and the files from the collections will not be lost.
# Generation of previews for vector and illustrations
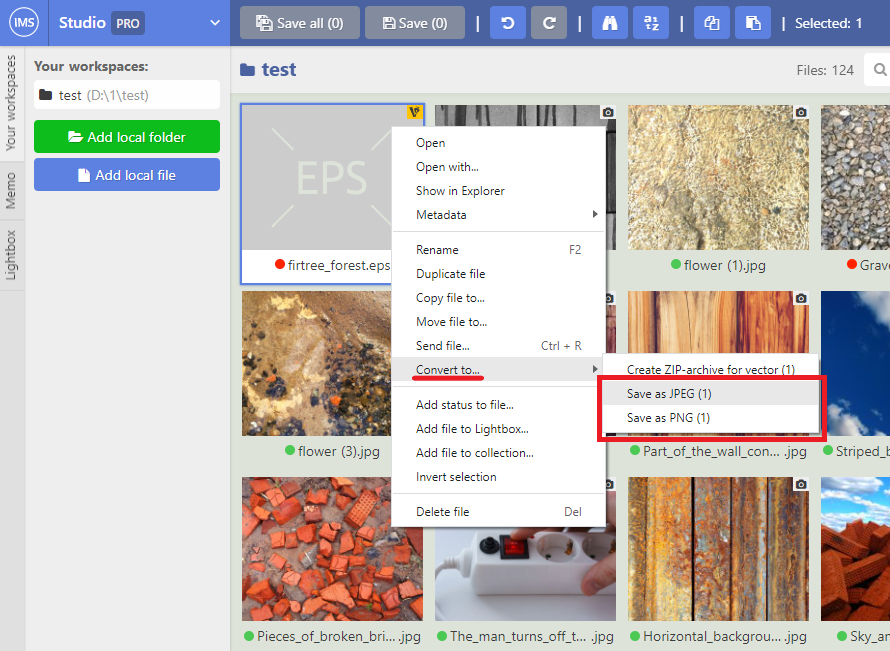
ImStocker Studio can generate thumbnails for vectors (SVG and EPS) in JPG or PNG format (with transparency). To do this, right-click on the vector and click the corresponding button
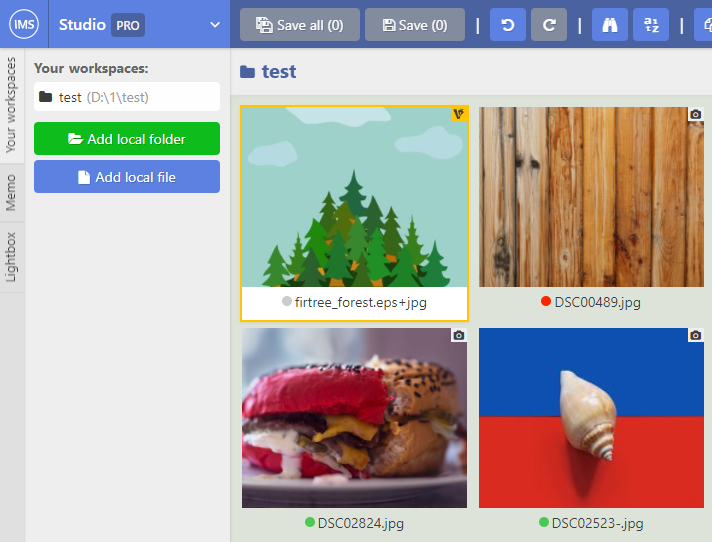
A preview file will be created:
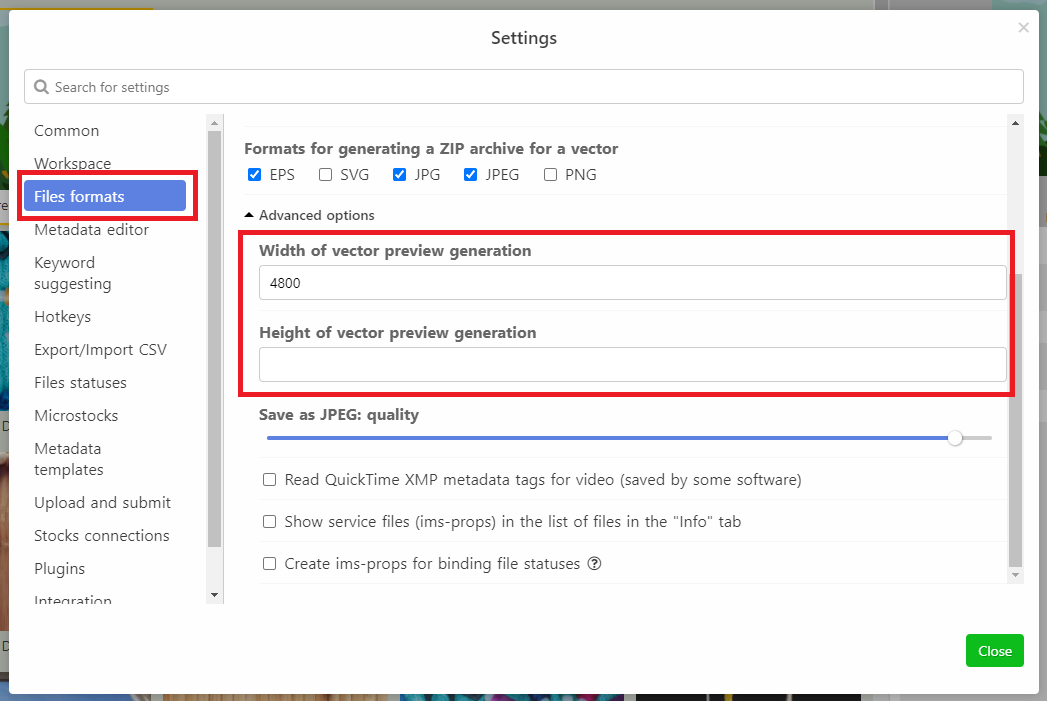
You can adjust the width and height when generating a vector preview in the advanced settings of the "File formats" section:
Similarly, you can generate JPG previews for illustrations (PNG files)
TIP
It's important to note a couple of things:
For Windows users: in order for the program to generate a preview of the EPS file, you need to install Ghostscript on your computer and enable integration in the settings (see section "Integration with Ghostscript (Windows)").
Due to the peculiarities of the ESP format, not all such files can be saved as PNG with transparency.
Like other commands, this command can be called on multiple files at once.
TIP
By default, previews for vectors are generated automatically on upload and submission if it is required by the selected connections. You can change this in Settings -> Upload and submit (see here).
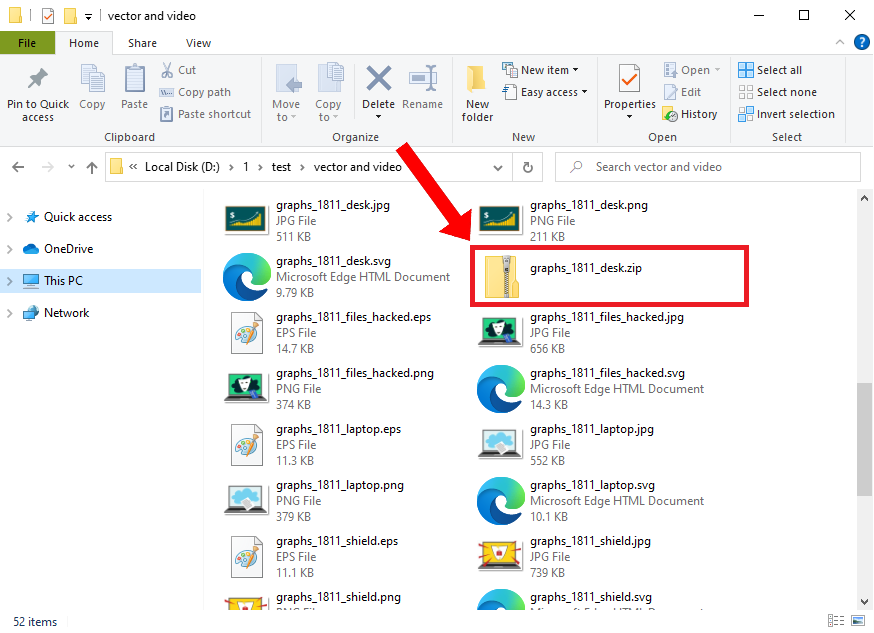
# Creating ZIP archives for vectors
The ImStocker Studio program also allows you to create ZIP archives of vectors with previews right away without leaving the program. To do this, right-click on the file in the workspace and select Create ZIP archive for vector:

A ZIP archive will be created for the selected file:
TIP
By default, the creation of ZIP archives for vectors is performed automatically on upload and submission, if it is required by the selected connections. You can change this in Settings -> Upload and submit (see here).
Like other commands, this command can be called on multiple files at once.
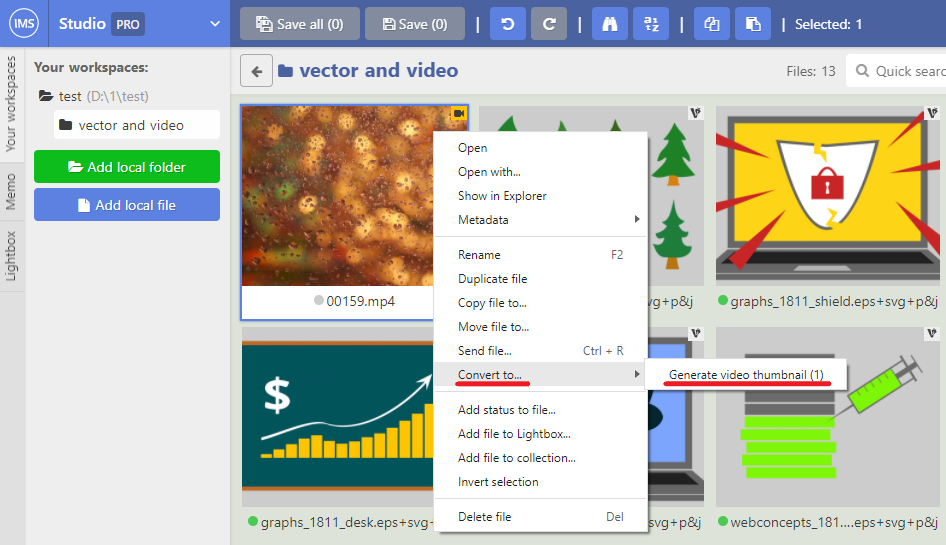
# Video preview generation
To generate a video preview, you need to right-click on the video in the workspace and select Generate video preview:
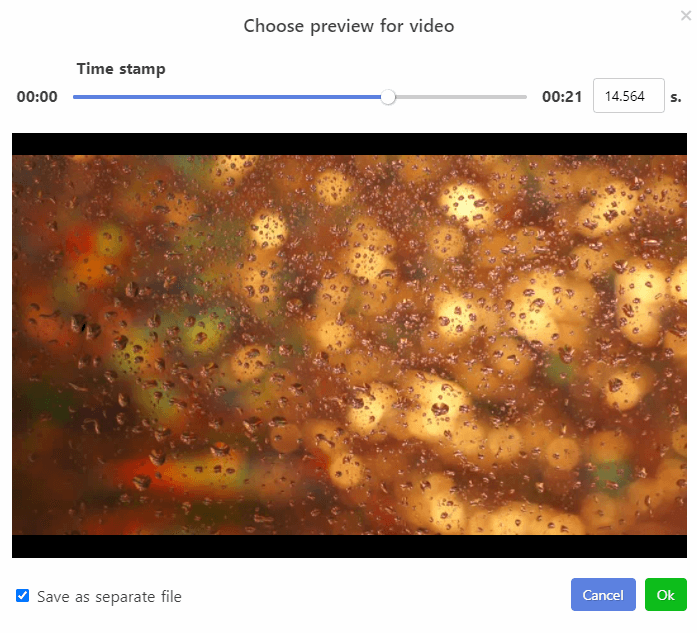
A window for selecting a preview will open. You can enlarge the preview by clicking on the image. To select a specific video frame, you need to set a point in time using the slider or a number:
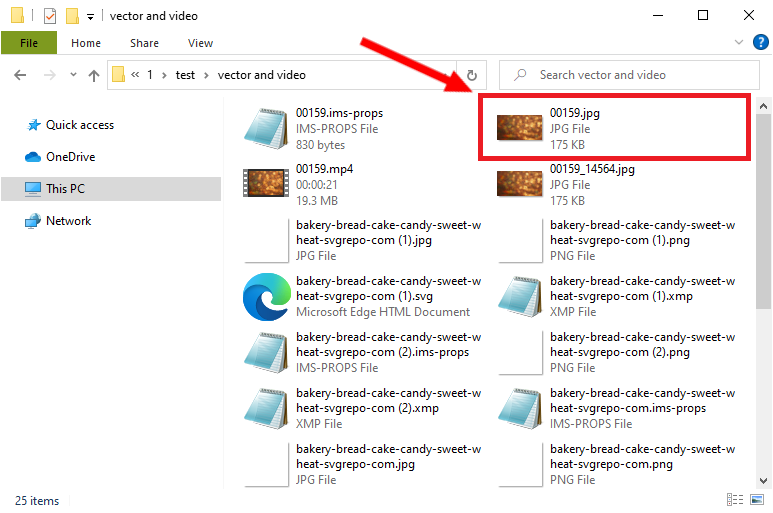
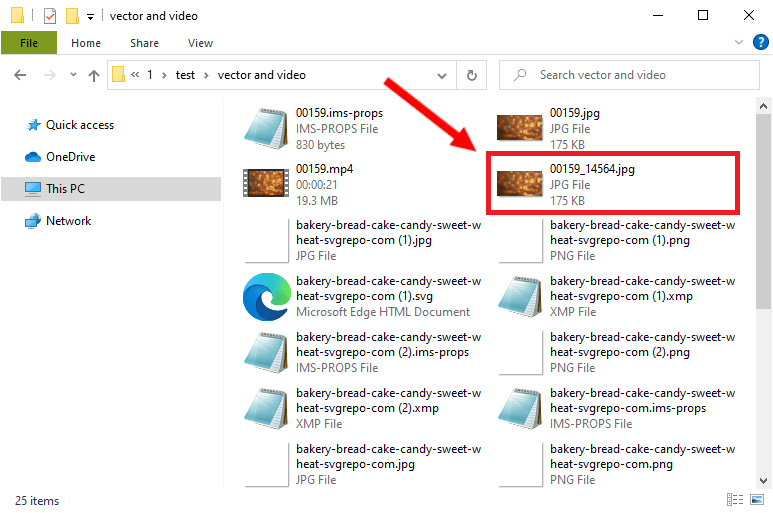
A .jpg format file with the same name as the video will be created:
You can save the preview as a separate file without closing the dialog box. Just right-click on the desired frame, select "Save as a separate file" from the context menu and the desired frame will be saved on your disk. In this case, a .jpg format file will be created with a name that includes the name of the video and the moment in time that you have chosen.
Like other commands, this command can be called on multiple files at once.