# Files editing
# Editing panel
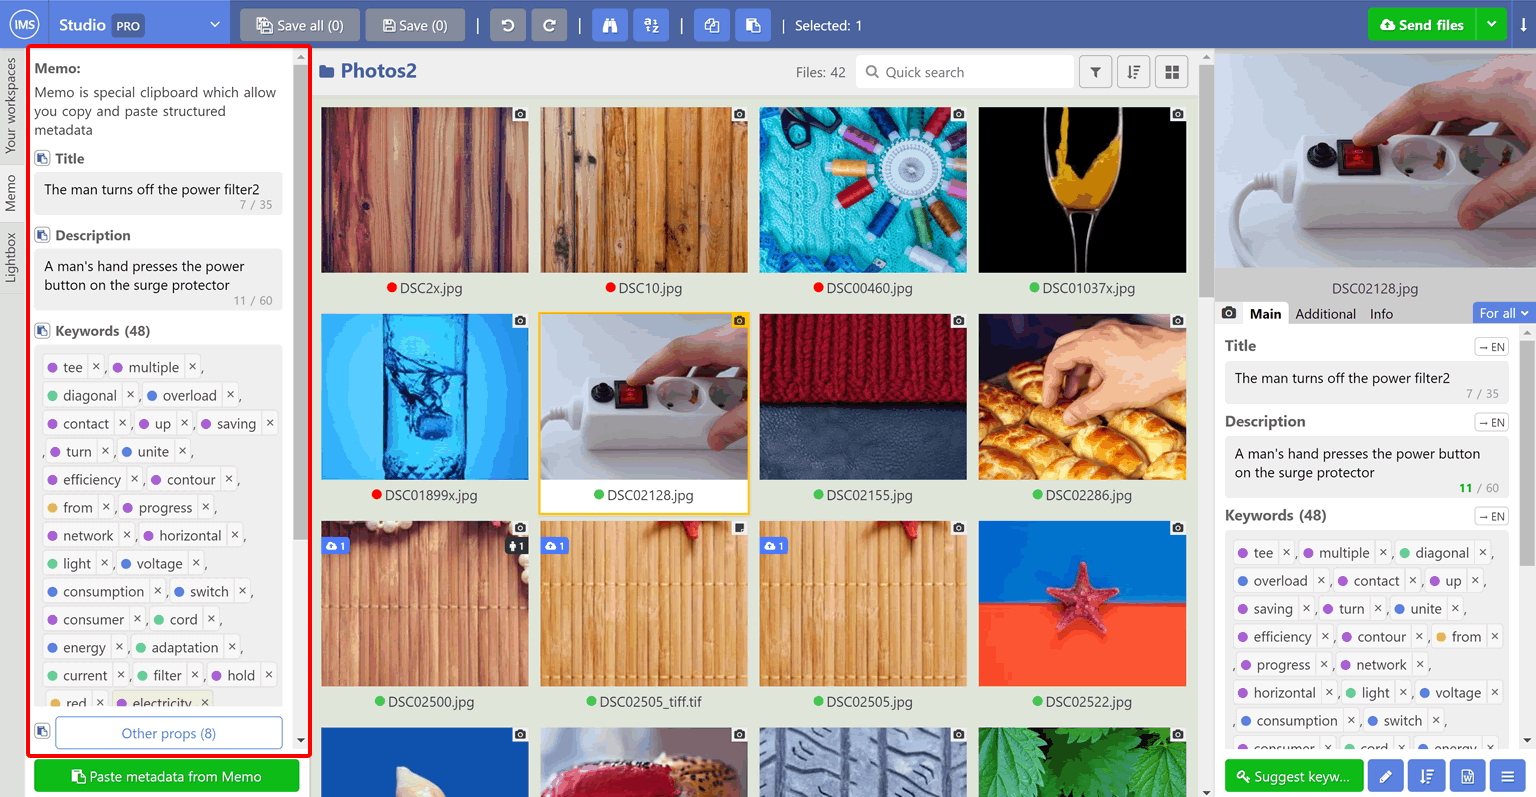
To edit metadata, select one or more files in the workspace.
The selected files will be displayed in the right sidebar, which is divided into two parts: preview block and edit block.
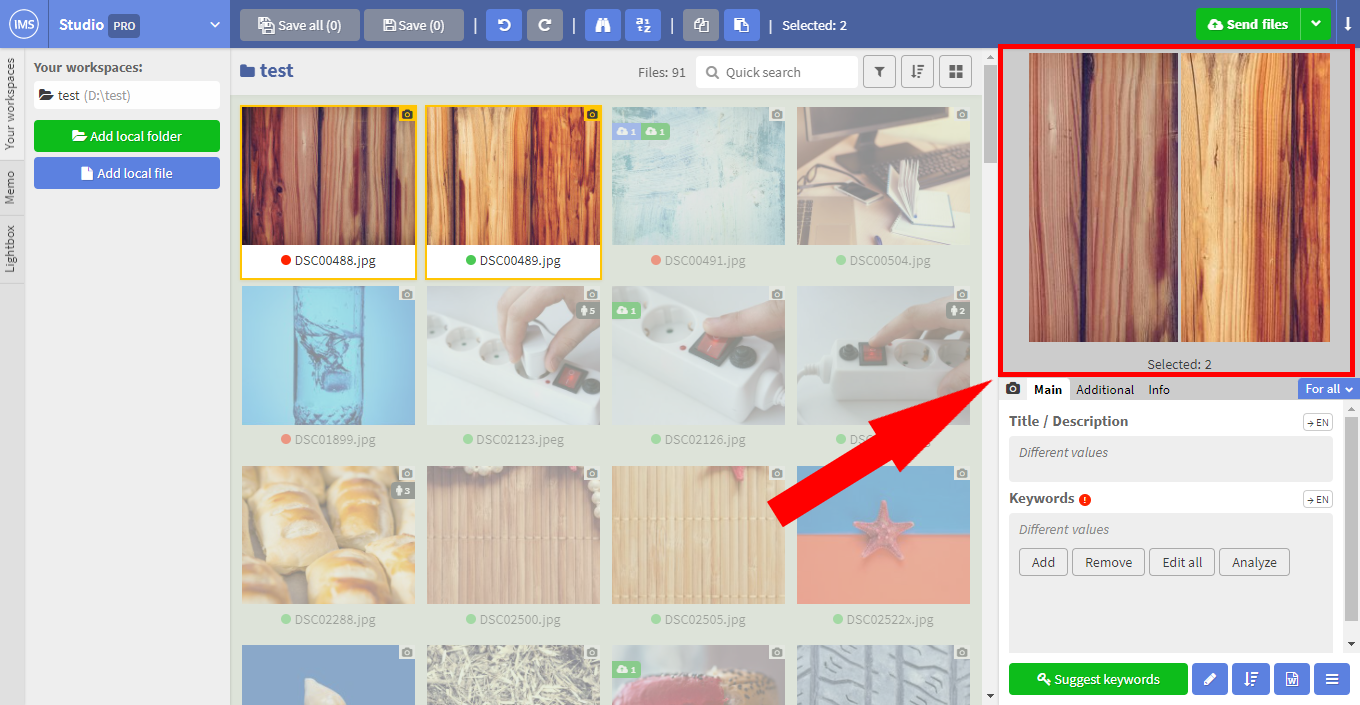
Preview block displays a thumbnail of the currently selected file or files. You can resize it by dragging the bottom edge of the block.
Clicking on thumbnail will open englarged version of image, if only one file is selected
If several files are selected, then by clicking on the thumbnail, you can switch the active file to corresponding file. In this case, a checkbox "Edit all selected" will appear under the thumbnail. If this checkbox is enabled, all selected files will be edited at once, otherwise, only the active file will be edited. You can also switch the active file using the "left" and "right" buttons. They are appearing when you hover over the thumbnail.

Editing block, in turn, consists of three tabs: Main, Additional and Info
The main fields are Title, Description and Keywords (except for releases - they have their own fields, see "Releases")
TIP
Title and description can be combined (see here)
All other fields are on the Additional tab, we will tell you more here
Tab Info contains information about running processes, statuses and individual files of selected asset
# Editing metadata
In order to make a change to the file, select the desired edit field and enter a new value.
After changing (and switching to another element), the file will be marked as changed, its name will be written in bold. You can undo your change (and then redo it again) using the undo and redo buttons at the top of the app.
After finishing editing, click on the Save button (Ctrl/Cmd + S) to save the currently selected files, or Save All (Ctrl/Cmd + Shift + S) to save all modified files, including those that are not currently selected.
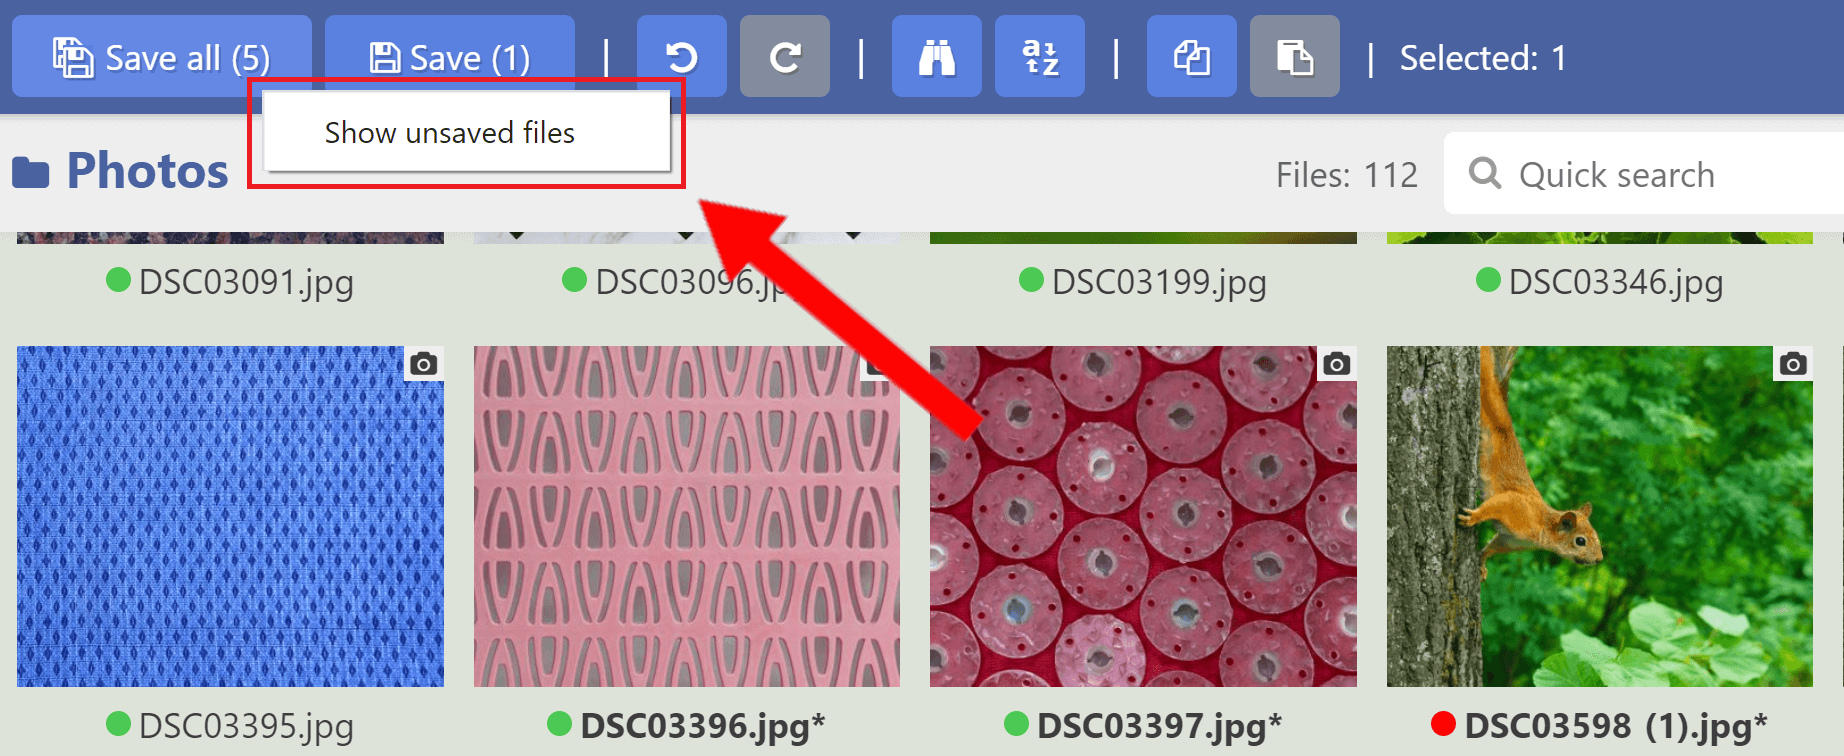
The Save All button has a context menu. When you have processed more than a dozen files and take a break, it is difficult to remember which files have been changed. To view a list of unsaved files, right-click on the Save All button and select Show unsaved files
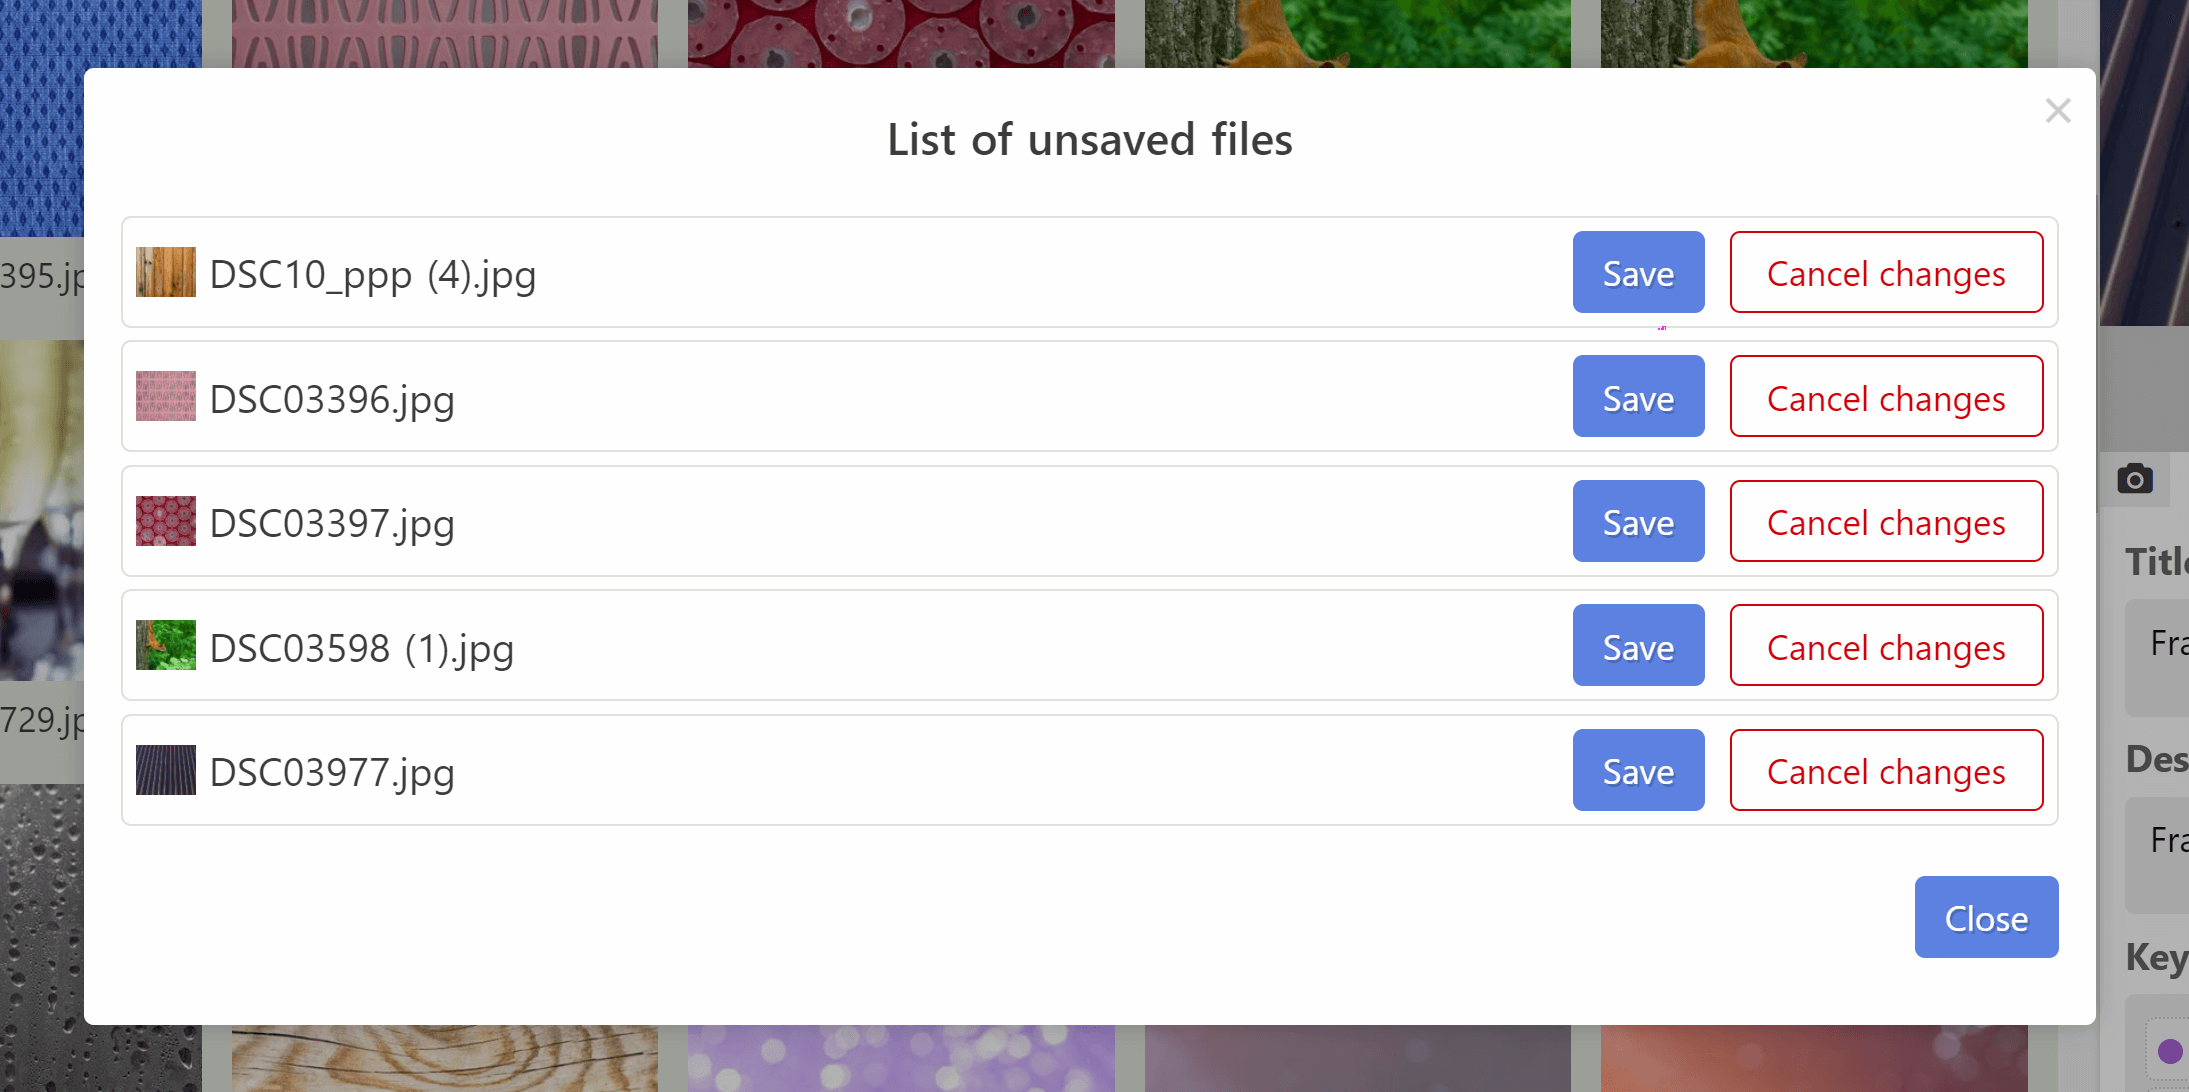
A dialog window will be opened where you can decide whether to save or discard changes on a per-file basis. If you wish, you can enlarge the picture by simply clicking on the block with the name. You can close the enlarged image with Escape key.
The Save button also has a context menu. Using option Forced re-save you can resave selected files that are not marked as modified.

# Additional editing functions
In the lower right corner of the program there are several functions that greatly simplify the work with keywords:
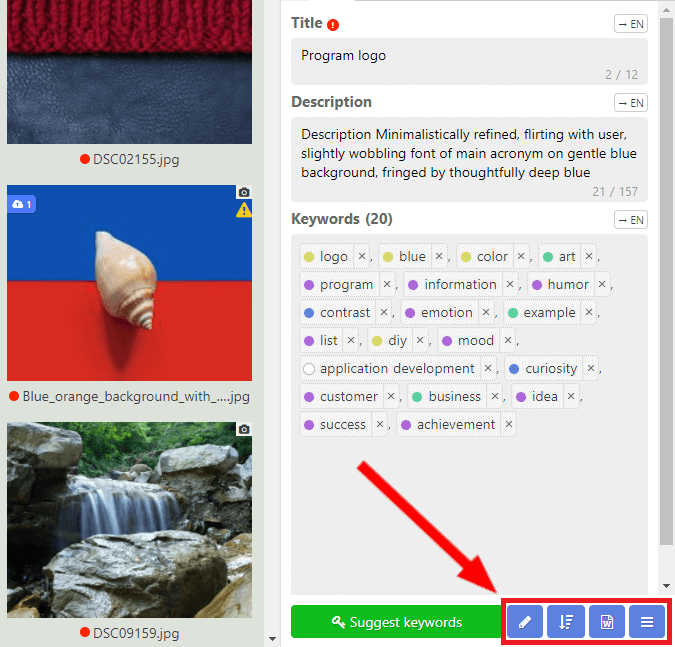
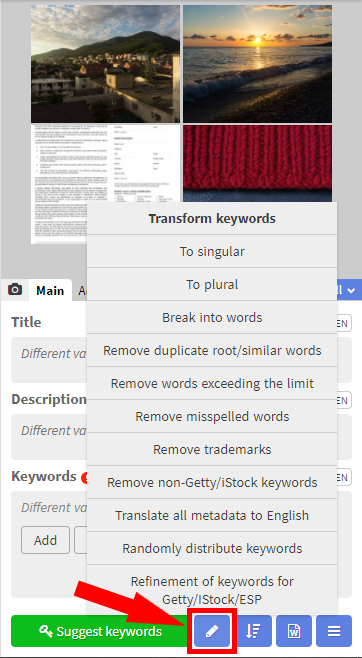
The Transform keywords button allows you to make quick changes to all keywords at the same time: you can change words into singular/plural form, remove duplicate root/similar words, words exceeding the set limit, words with errors and use other useful functions.
One of such function is "Randomly distribute keywords". This feature is very useful when dealing with similars whose keywords need to be slightly different. For example, you have 70 keywords for group of similar images and you want the first 30 keywords to be in all files, and the remaining 40 keywords to be randomly distributed. To do that, enter 70 keywords into one of the file, select other files and click corresponding button in the menu. After that, the program will ask you how many of the first keywords should remain in place and how many keywords to distribute the rest.
Next to the button in the form of a pencil is the button Sort by... It allows you to sort keywords by popularity, number of downloads, alphabetically in forward and reverse order, as well as randomly.
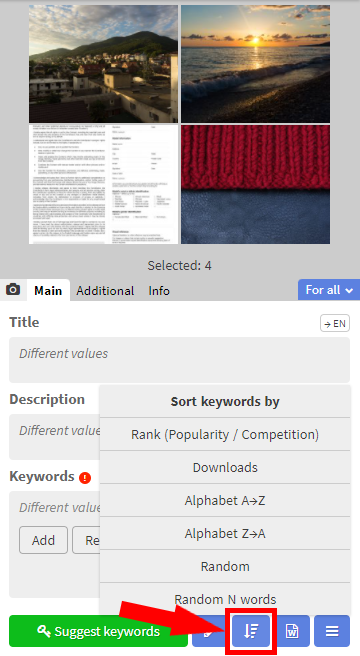
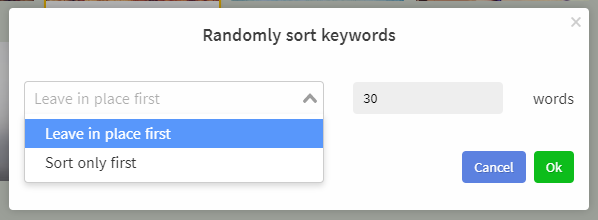
In addition, the program has a special kind of random sorting of keywords, in which you can also select what keywords need to be randomly sorted. For example, you can leave the first N words in place, and sort the rest. Or the second option, you can sort only the first N words. Unlike the "Randomly distribute keywords" function, here the keywords are not distributed, but simply sorted within a single file. To activate the function, you need to select the item “Randomly after N words” and specify the number of first words and the operation on them.
The Templates button allows you to create your own set of keywords and quickly apply it if necessary, It greatly simplifies the work with keywords when working with a large number of files of the same topic. Moreover, you can activate the template directly while entering keywords using special shortcuts (you can assign digit key + Alt to any tempalte). For more information about templates, see the "Templates" section.
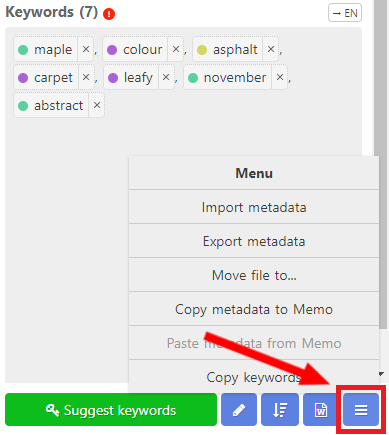
The Menu button allows you to work with the functions of import / export of metadata, use the metadata buffer and perform other actions with files
TIP
Do not forget that you can select and edit several files at once, and they do not have to be in the same folder
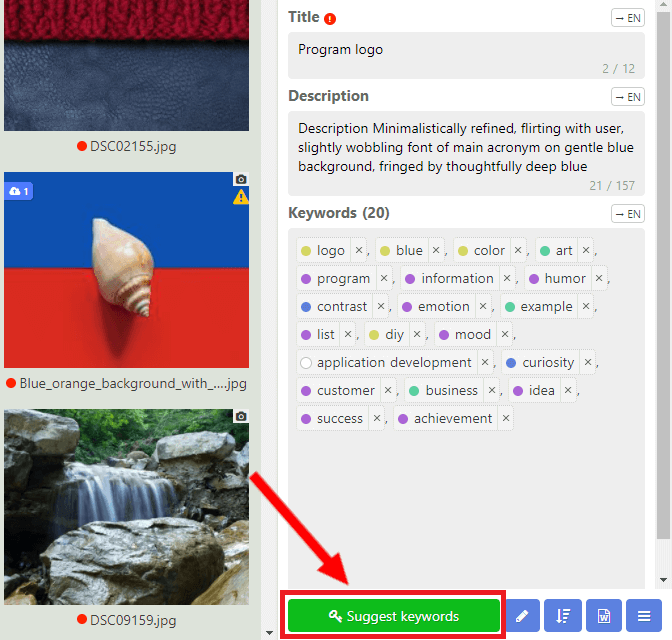
# Keyword suggesting
In the lower right corner of the program, you can also find an integrated keyword suggesting service ImStocker Keyworder, which allows you to quickly find keywords used on microstocks using a number of convenient filters.
In order to use the ImStocker Keyworder service, you need to select one or several files to which you will select words, and click the Suggest keywords button:
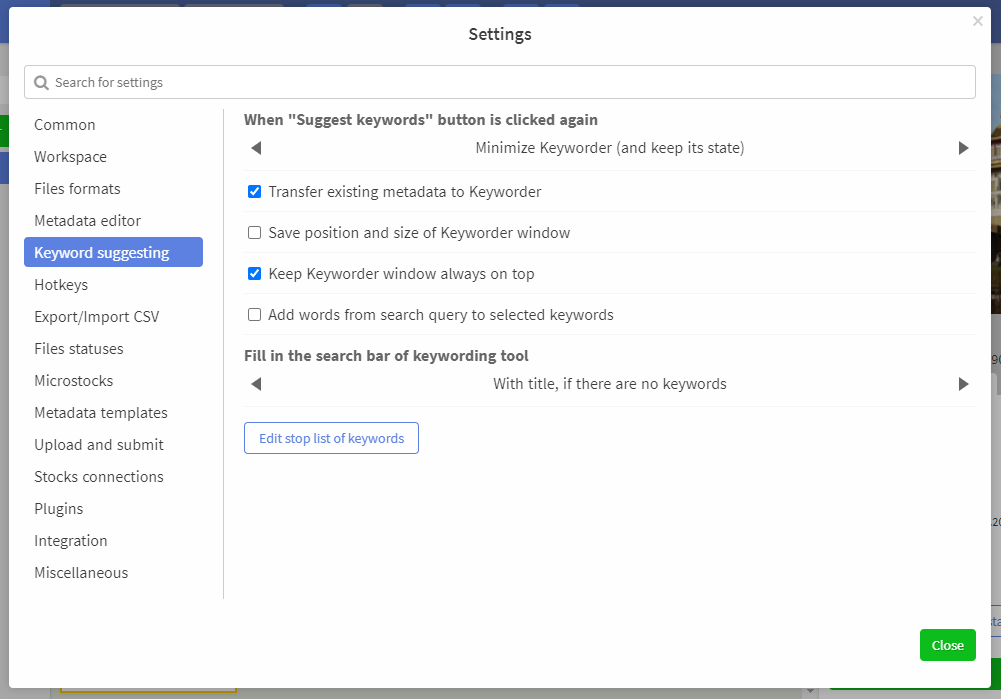
To get the first results, it is enough:
1. Enter one keyword in the search bar and press the Enter key or the search button

For the convenience of the user, there is a function for auto-filling the search bar with a title or description of selected file. It is located in Settings - Keyword suggesting:
2. Select one or more images that are similar to your file:
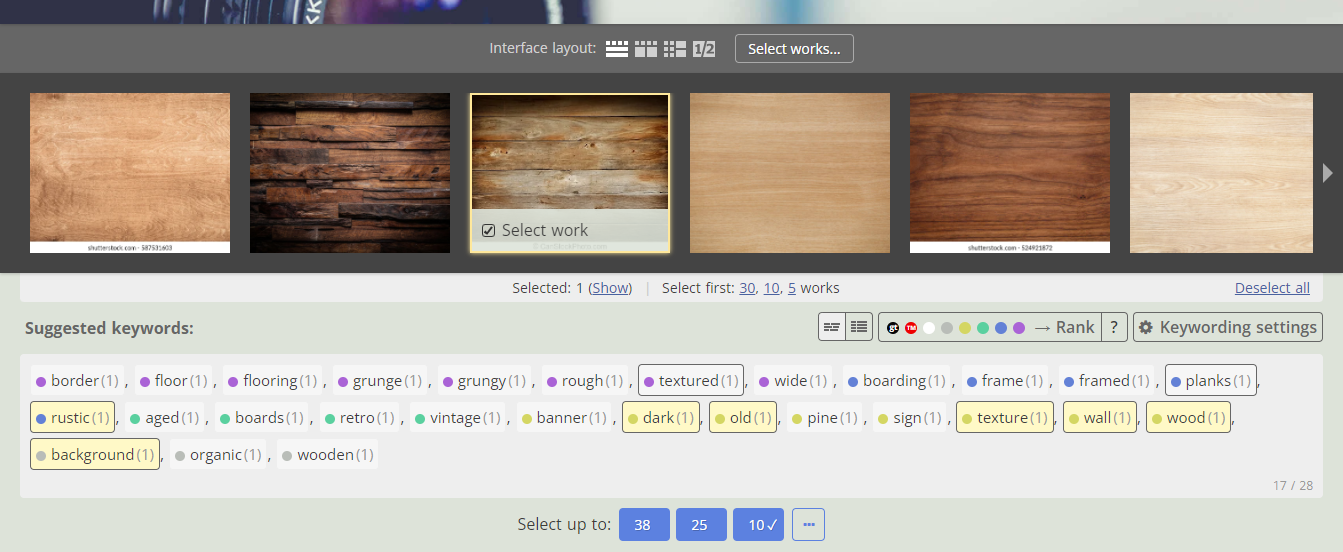
3. Choose suitable keywords
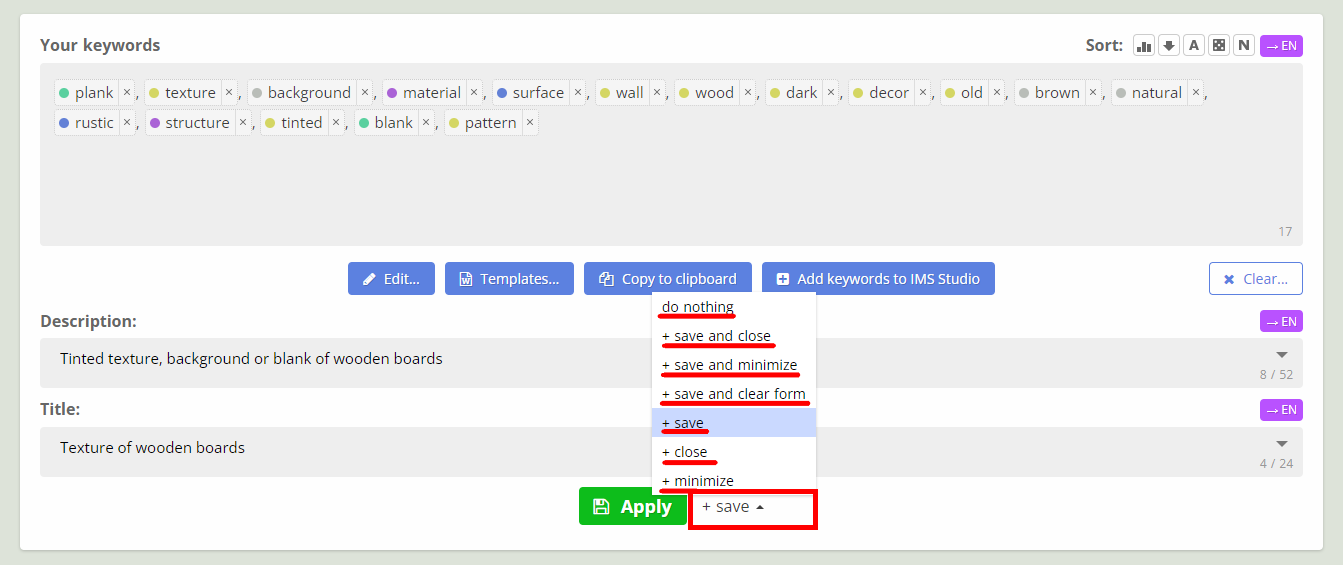
After the list of keywords is formed and completely suits you, you can click Apply button to save result to selected flles in the ImStocker Studio. You can also specify what to do with the window ImStocker Keyworder after keywords has been applied:
Settings for changing the behavior of the ImStocker Keyworder window can be found in Settings -> Keyword suggesting:
# Refinement of keywords for Getty/IStock/ESP
As you know, GettyImages (IStock/ESP) has its own idea of what keywords can be used when describing files. ImStocker Studio allows you to refine your keywords without leaving the program by selecting the closest words from the Getty/IStock dictionary.
To take advantage of this feature, you must do the following:
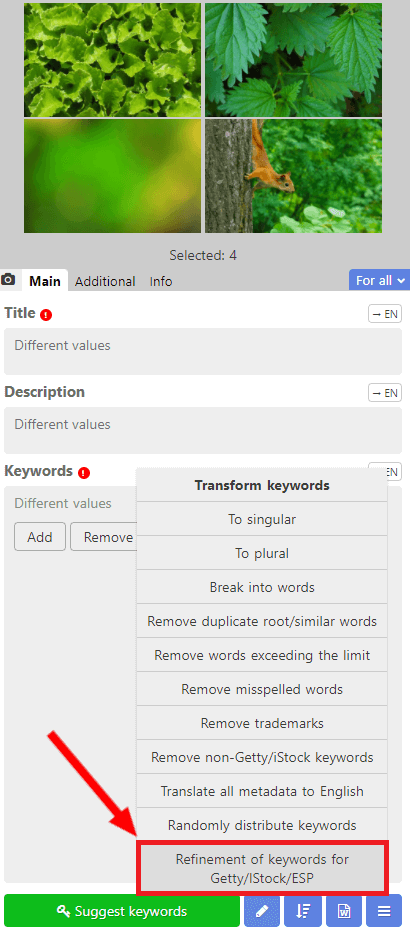
Select the desired file(s), click on the blue square button with a pencil inside and select Refinement of keywords for Getty/IStock/ESP from the drop-down list
A window will open with keywords, their definitions and translation. Select the required specifications by left-clicking on them
WARNING
For 1 keyword, you can select only 1 refined term.
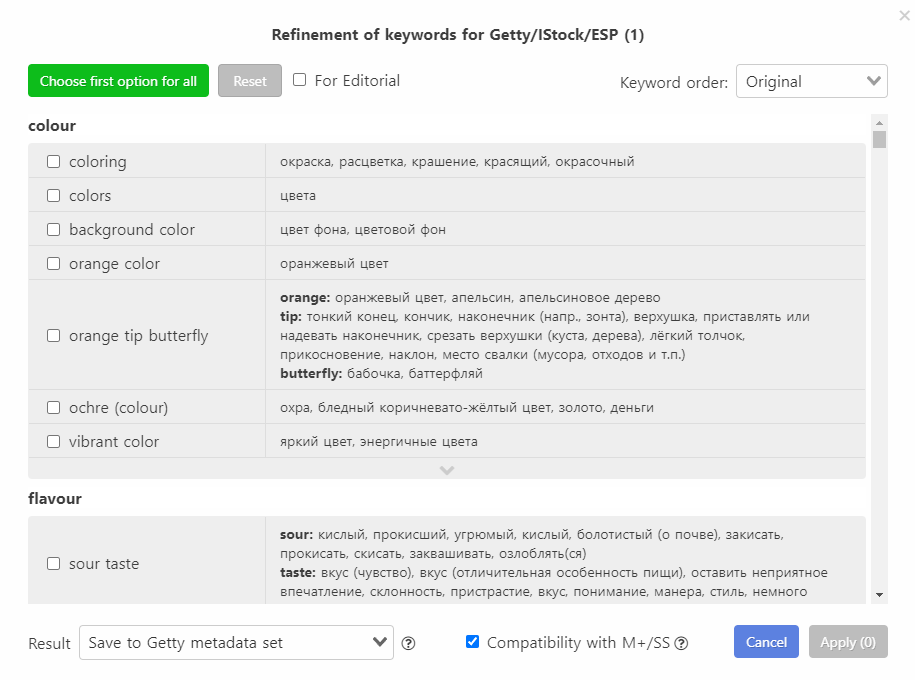
If required, you can select the first option for all or reset the selection by clicking on the appropriate buttons.

You can also use the "For Editorial" checkbox to turn keyword suggestions on and off, which are used only for editorial images.
After selecting all the desired refiners, you can choose what to do with the result:
Save to Getty metadata set - the result will be saved to a special metadata set. This metadata set will be used when you export metadata to CSV for Getty or when you submit files to it (if you have the appropriate plugin)
Save to a separate JPG-file - in the folder next to the file for which refinement is performed, a new file will appear with the ending _getty.jpg, in which the refined keywords will be written
Replace current keywords - updated keywords will be written instead of the current keywords.
In addition, if you use the M+ service or the SS program to submit files to microstocks, you can check the box Compatibility with M+/SS. In this case, the refined terms will also be written to a JPG file under a special metadata section that these programs can read.
In M+/SS compatibility mode, you can also specify a batch name for ESP:

# Translation of metadata
Metadata Translation allows you to instantly translate a file's metadata from your language into English. You can translate each field with a separate button or use the command "Translate all metadata to English" in the menu with the pencil icon:
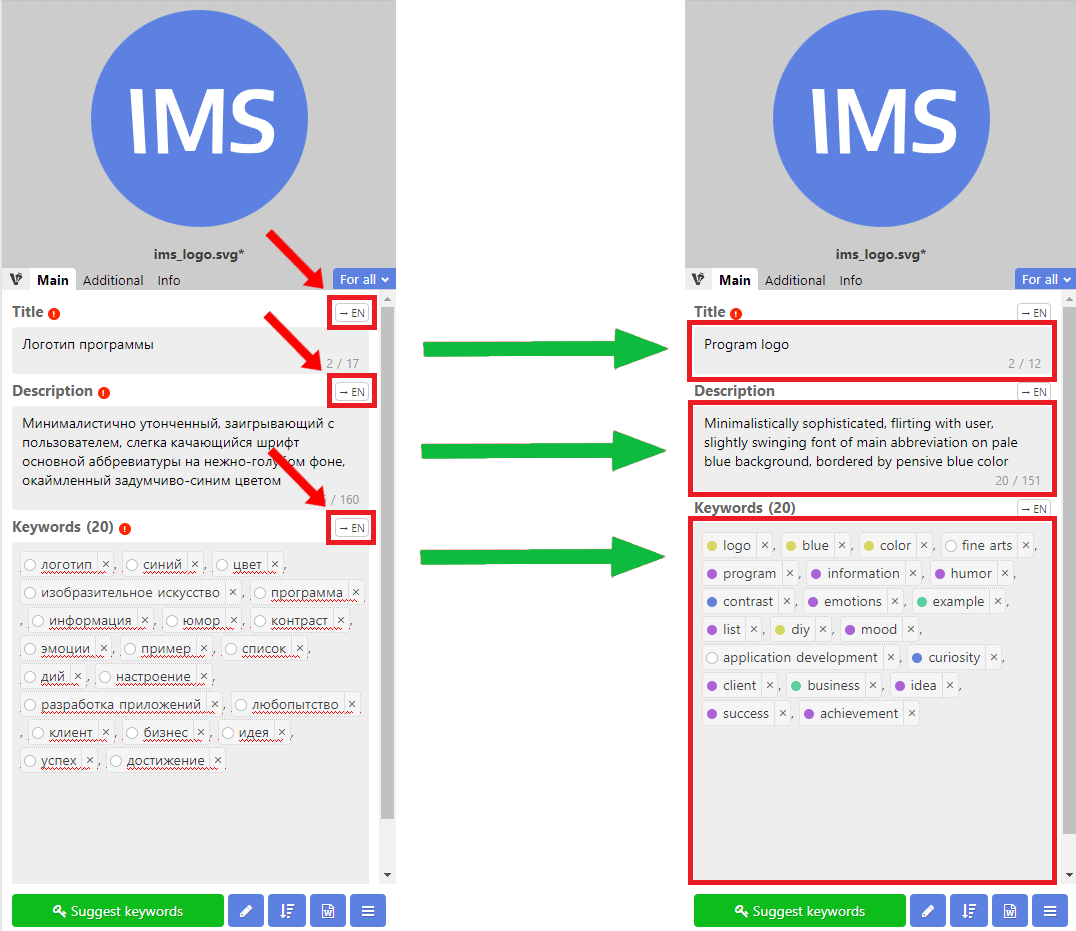
In addition, you can translate not only into English, but also back into your native language. This is useful if you need to make some changes to an already attributed file.
To translate back to your language, hold down the Alt key while clicking on the translate button. The same can be done using hotkeys: Ctrl/Cmd + Alt + T. To translate all metadata, hold down the Shift key while clicking on the translate button.
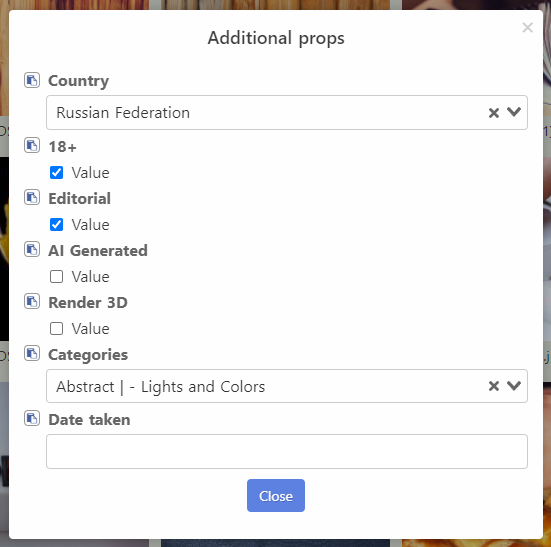
# Additional properties
Let's take a closer look at the Metadata editor -> Advanced tab. It has many useful functions:
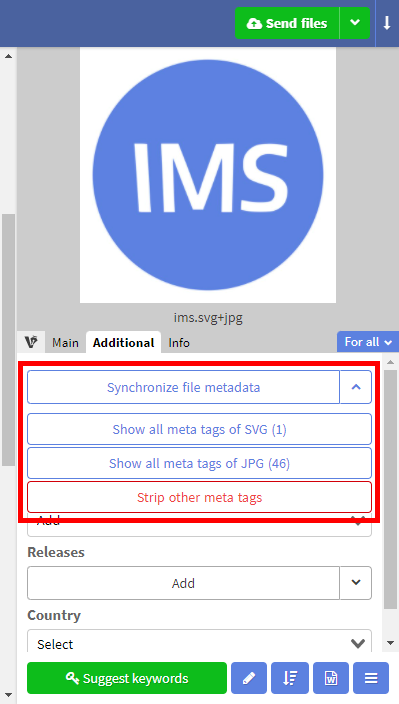
- Block of functions for working with file meta tags. Here you can view all IPTC/EXIF/XMP file metatags, synchronize them or delete them (details here)
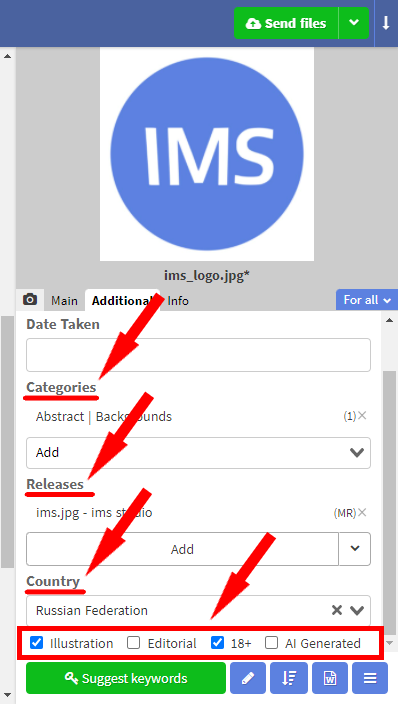
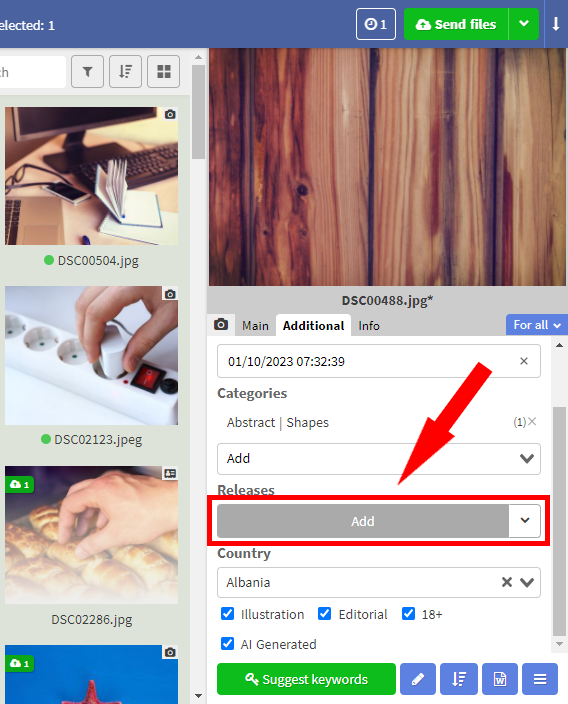
Field to set shooting date. You can specify it in 2 ways: either using the calendar, or enter it manually.
Field to add categories
WARNING
One file can be assigned no more than 3 categories.
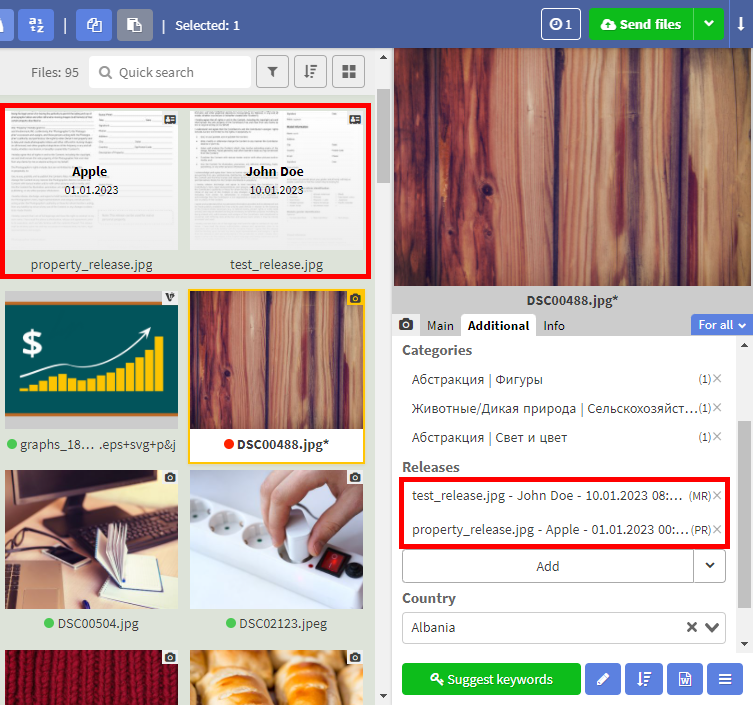
Field to attach model and/or property releases to files. Read more "here".
Field to specify country
Block of additional marks:
- Editorial - editorial image or video,
- 18+ - intended for adults
- Illustration - upload photo as an illustration
- AI-generated - file was generated by artificial intelligence
- Render 3D - file was obtained by rendering a 3D scene
# Show and strip other metadata
If you want to know what kind of metadata you are sending to microstock agencies, there is a Show all meta tags function in the Advanced tab.
Clicking on it will open the following dialog
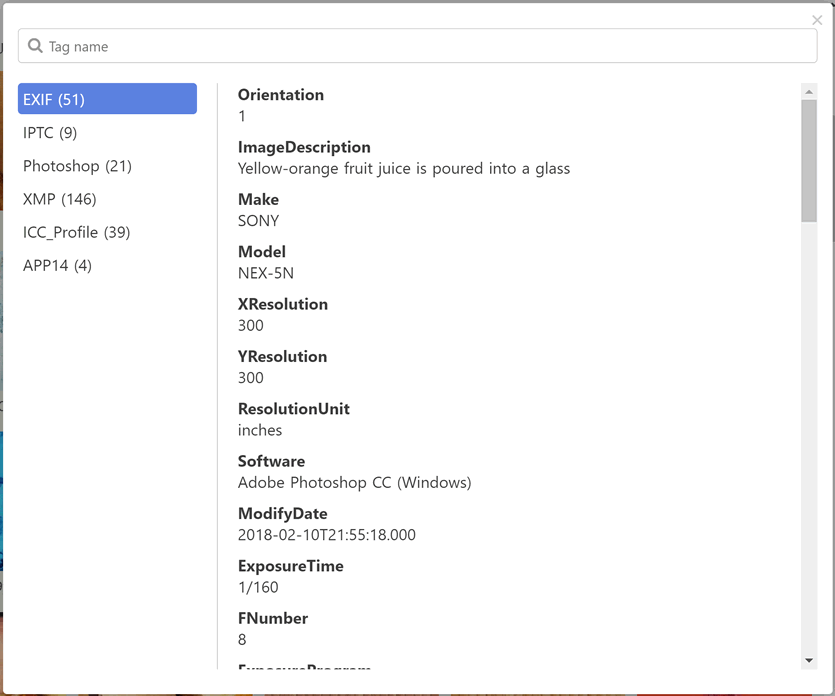
Here you can see all the tags that are written inside the file, grouped by type. There is also a tag search bar
The button "Synchronize file metadata" is located in the same block of buttons. It is displayed if the files of the same asset contain different values for the title, description, or keywords (for example, image.jpeg contains one set of keywords, but image.png has others). Clicking this button will re-save the same metadata to files
DANGER
In addition, this block has a "Strip other meta tags" button, which allows you to clear the file of extraneous tags (attention, the operation cannot be undone).
# Attach releases
To add a release, you need to select one or more files, go to the Info -> Advanced tab and click on the Add (to all) button.
In the window that appears, select the desired file. A new window will open in front of you, where you can set the parameters. Depending on the type of release, there will be different options:
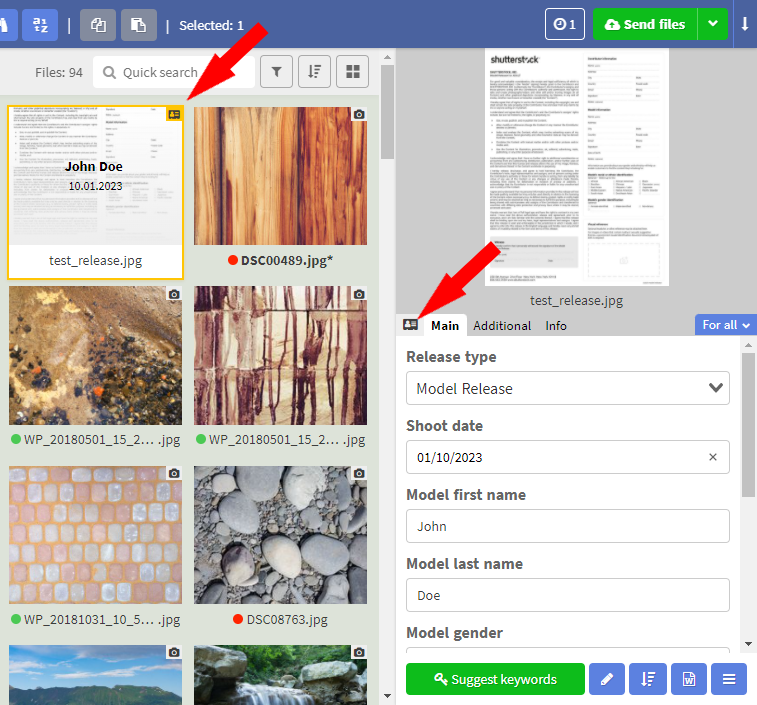
- For the Model Release type, you can set the shooting date, first name, last name, gender, date of birth, ethnicity, country, and release form.

- For the Property Release type, the date of shooting, the name and owner of the property, as well as the country and form of release are indicated.
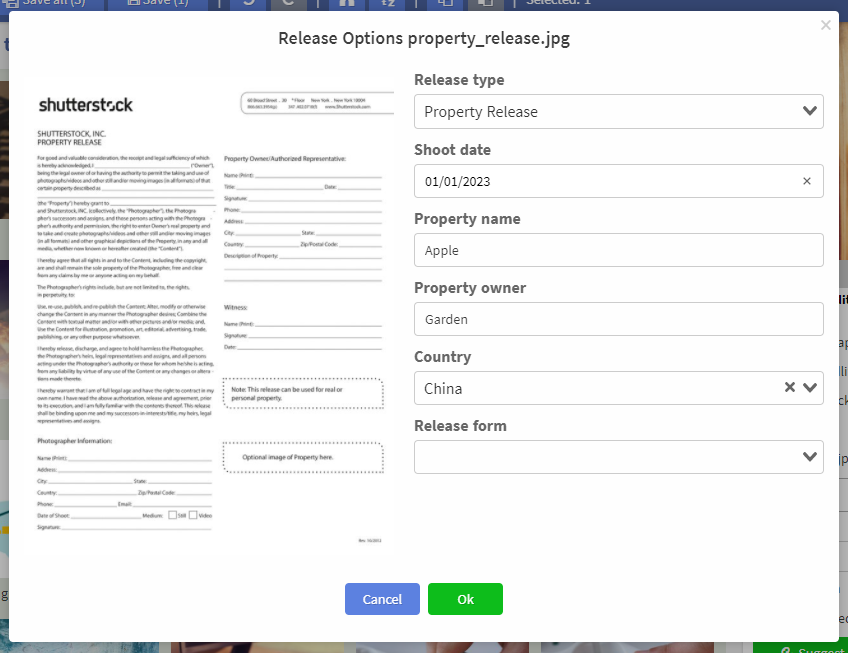
Recently used releases can be quickly found using a drop-down list. When you click on one of the items, the release will automatically be added to the selected files. To delete a specific release, click on the cross and confirm the action.
To edit a release, you can either click on the corresponding element in the Releases section, or find a file in the program and change its parameters through the metadata editor panel. To make it easier to distinguish a photo from a release in the list of files, releases are marked with a white highlight at the bottom and the model/property name is indicated on the tile. Don't forget also that you can use the file type filter)
DANGER
If you accidentally choose the wrong file for release, delete the file with the same name, but with the extension .ims-props. In this case, the file will no longer be a release.
# Special metadata for microstocks
You can assign different metadata values for different microstocks, as well as fill in their specific fields. To do this, click on the blue drop-down list "For all" and select the desired microstock
TIP
You can configure the list of microstocks "here"
# Copy/paste metadata
ImStocker Studio implements a function for copying all file metadata and paste it to one or multiple file. It saves a significant amount of time when working with a large number of files
There are several ways to copy file metadata:
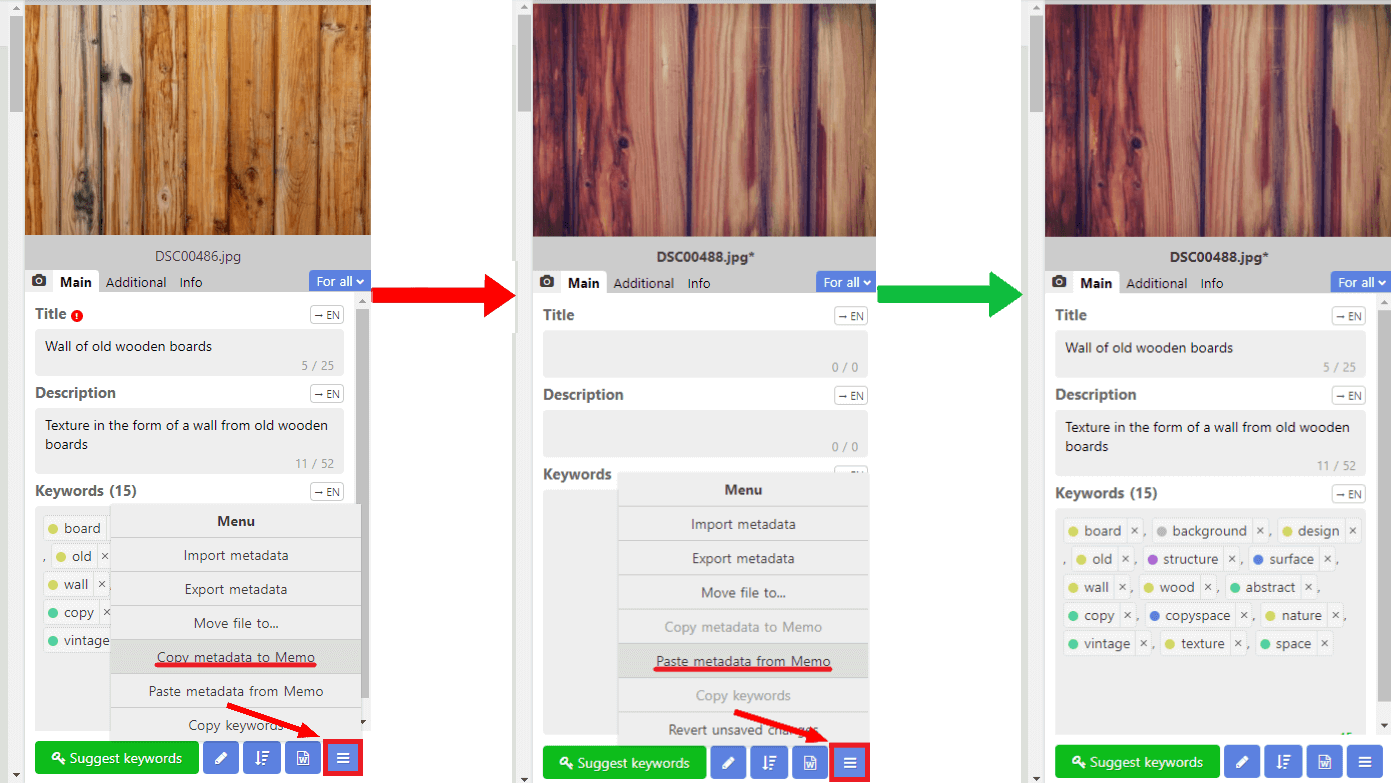
Through the context menu: when you right-click on the selected image, a context menu will appear, go to the Metadata -> Copy metadata to Memo section:
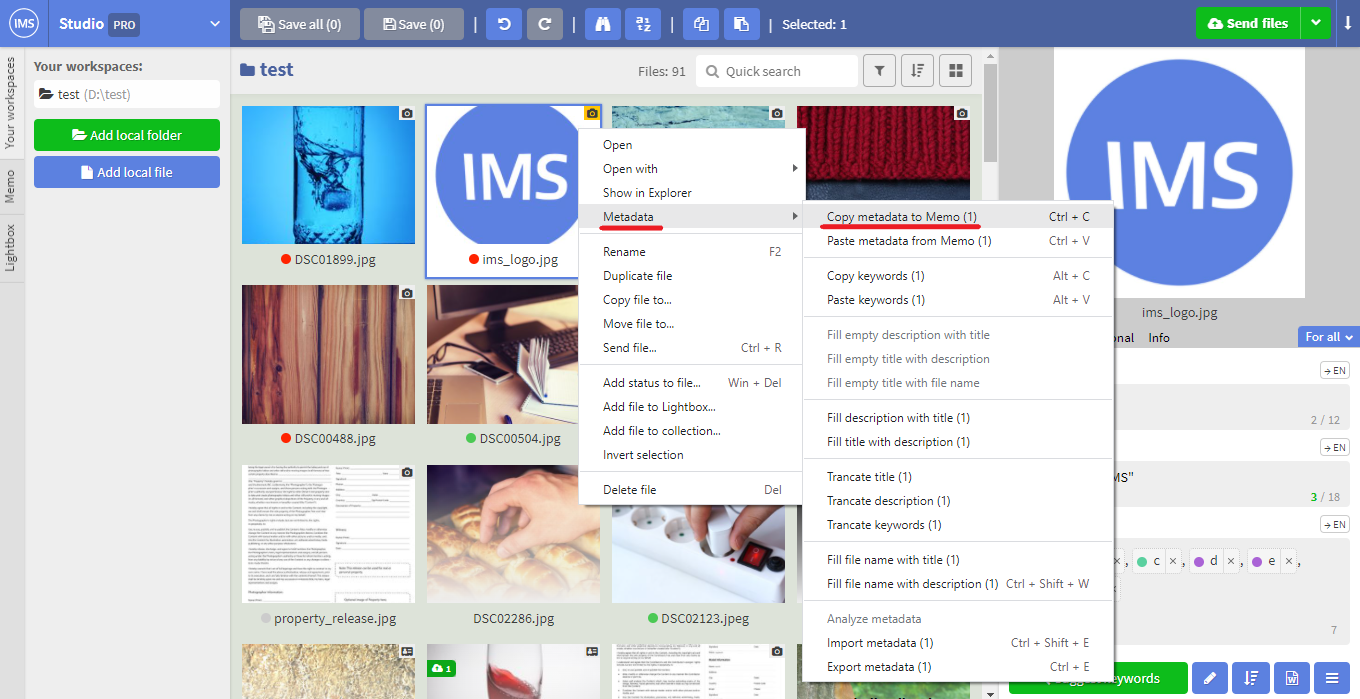
To apply the copied metadata to one or more files, select the desired images and right-click - Metadata -> Paste Metadata from Memo:
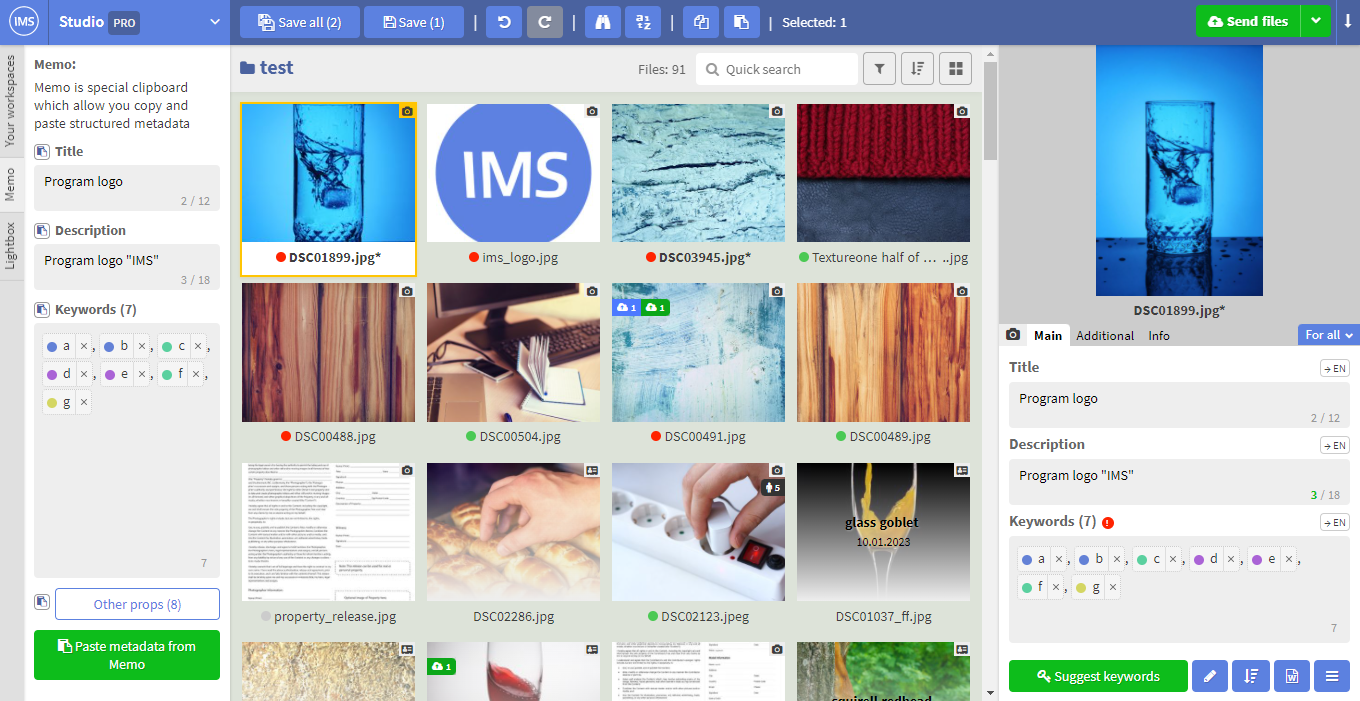
The metadata will be copied and will be identical to the original image's metadata.
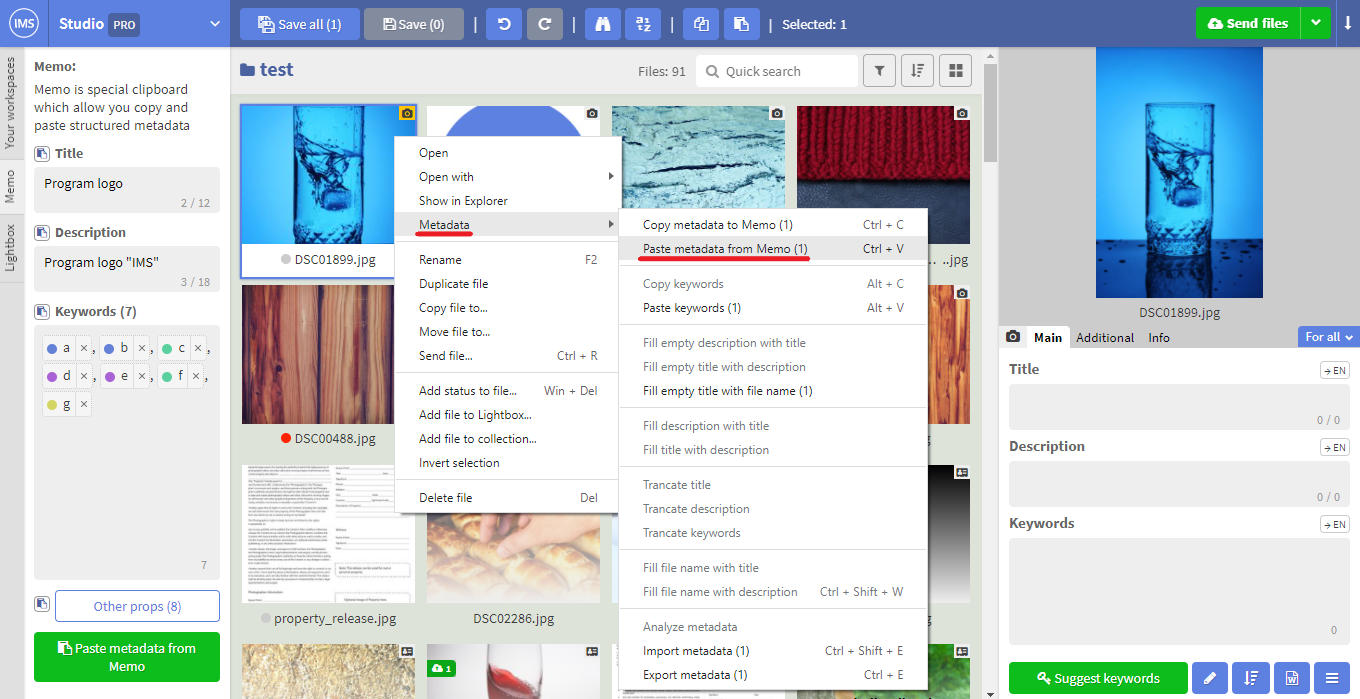
The second way to copy metadata is through the editing panel in the lower right corner of the program. Press the Menu button and select Copy metadata to Memo, then select one or more files where you want to copy the metadata and press Paste metadata from Memo:
At any time when working with copying metadata, you can see what is currently copied to the Memo, and also, if necessary, make adjustments before pasting metadata into another file. To do this, go to the Memo section:
TIP
Here you can mark the data from which fields should be inserted. To select, you need to click on the checkbox located with the name of the property. At the bottom there is also an Additional properties button. When pressed, a window with additional properties opens, the insertion of which you can also configure. In this way, you can copy and paste, for example, only categories without replacing the rest of the metadata
In the Memo panel there is also a button Paste metadata from the Memo, which will apply the values of the selected properties from the Memo to the selected files
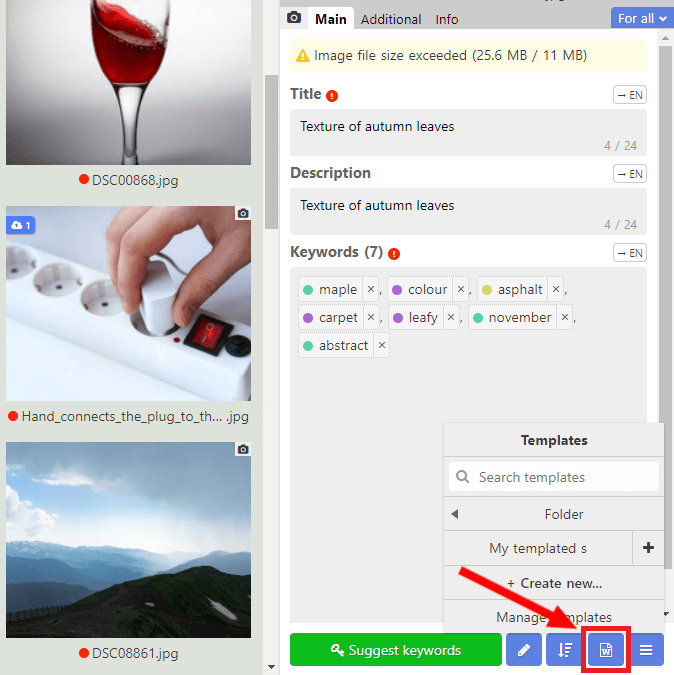
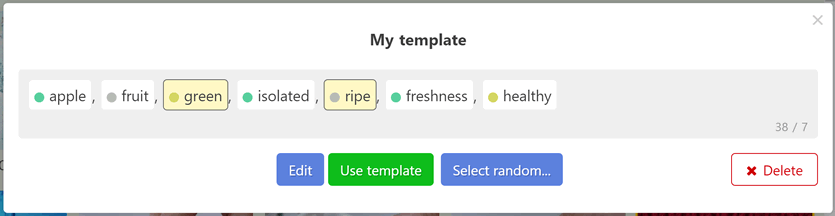
# Templates
Working with templates in ImStocker Studio will allow you to significantly speed up the process of adding keywords to files. The template management menu is located in the lower right corner of the program and appears when you select any image from the workspace:
This menu displays a list of already created templates, a button for creating a new template, and a button for managing the list of templates.
Clicking on the title next to the template name activates it and inserts its contents into the metadata of the current file. If you click on the button with the eye icon, a dialog will first appear in which you can either select only specific keywords, or all, or N random ones.
When you click on the template management button, the following dialog will be displayed:
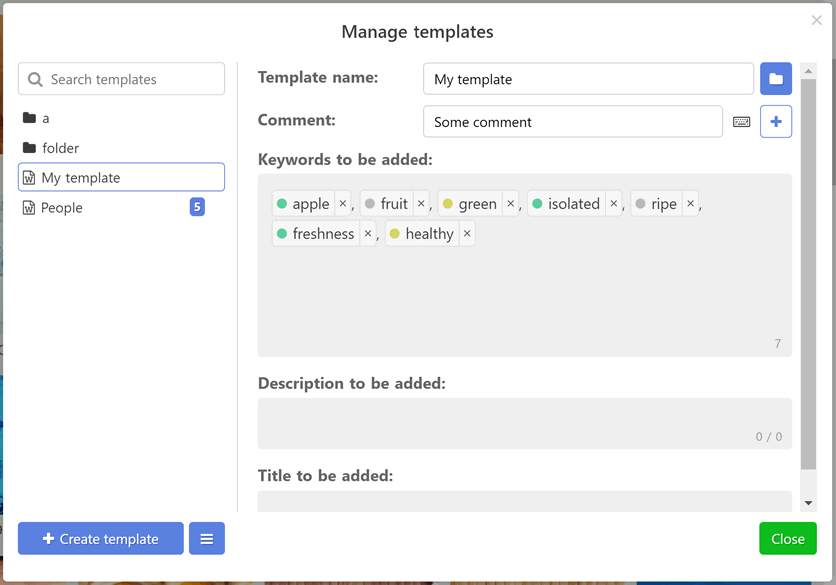
Here there is a list of all templates that were added earlier and a form for adding/editing a template.
When creating a template, you must specify a name and a set of keywords that it contains. If required, you can additionally specify the name and description which should be inserted when the template is activated.
You can group templates into folders. To do this, click on the button with the corresponding icon and set the name of the folder.
TIP
You can create a nested template structure. To do this, add an additional separator (slash character "/") to the folder name. For example, folder "a/b" means that the template will be placed in folder "b", which in turn is in folder "a"
In addition, you can add a comment to the template, which will be displayed when you hover over the name of the template in the list. As well as a hot shortcut - a digit. If you press Alt + specified digit when the input cursor is placed in the keyword editing field, then the contents of the template will be inserted without further action. If you press Alt + Shift + specified digit, then a dialog for viewing the corresponding template will be opened
The menu next to the Create Template button contains the Import/Export functions of templates. It will allow you to transfer templates between your devices or other users.