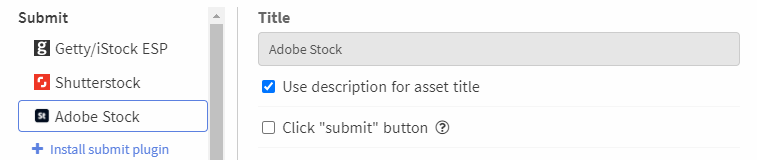
# Submit plugins
# General concept
Sending files to microstock in IMS Studio is the execution of a given process on files. The process itself is a set of interconnected steps (actions). Each of the files sent to the microstock goes through these steps untill it reached the end
A typical submit process consists of the following steps:
- Check that the files are meets requirements for uploading
- Authorize on the microstock website
- Upload files to microstock if they haven't been uploaded yet
- Wait a little time for the uploaded files to appear on the microstock site
- Submit:
- find downloaded files on microstock
- upload related releases to microstock
- save file metadata on microstock
- press the submit button
First step is done with the help of the filter system - through the filter conditions it is checked that the files meets technical requirements of specified microstock.
Second step is done by opening the built-in browser window. Usually, first an attempt is made to open the internal page of the author's personal account (target page). If it redirects the browser to a login form, then that form is displayed to the user. He enters his data, and then, as soon as the user gets to the target page, it is considered that authorization has been passed.
Third step is usually done via FTP/FTPS/SFTP (although there is nothing restricting you in how you implement this step)
Fourth step is implemented as a timer. In addition, before performing the submit itself, the program usually waits until several files will be already uploaded to do submission for all files at once.
Fifth step is performed again using the built-in browser, only this time it is not shown to the user at all. When executed, the same browser instance is used as when authorizing so the user is usually already authorized in the system. Code of submission logic is running after loading a given page on a microstock site. It must be written in Javascript.
# Submit plugin structure
For the submit plugin, we need to create a plugin containing three entities:
- destination - microstock
- ftp - FTP connection
- submit - the process of submitting
The project file structure will be as follows:
my-plugin
|- index.json              -- plugin structure description
|- icon.png                -- plugin icon
|- my-destination.json     -- plugin content: microstock
|- my-ftp.json             -- plugin content: FTP connection
|- my-submit.json          -- plugin content: submit
|- my-submit-code.js       -- JS code for submission
|- my-submit-dict.json     -- dictionaries for JS code (optional)
Example content of index.json:
{
    "name": "my-plugin",
    "title": "My plugin",
    "version": "1.0.0",
    "authors": "Me",
    "description": "Submit to my microstock",
    "website": null,
    "icon": { "@urlfile": "icon.png" },
    "content": [
        { "@jsonfile": "my-destination.json" },
        { "@jsonfile": "my-ftp.json" },
        { "@jsonfile": "my-submit.json" }
    ],
    "api": "2.9.0",
    "locale": {
    }
}
TIP
You can download the complete plugin example from the link provided in the Plugin Template section.
# Plugin content: microstock
The structure of the microstock description is as follows:
{
    "type": "destination",                      // 1. Entity type
    "name": "my-destination",                   // 2. Service name
    "title": "My destination",                  // 3. Display name
    "icon": "https://example.com/favicon.ico",  // 4. Icon
    "content": {
        "maxNumberKeywords": 50,                // 5. Keywords limit (optional)
        "maxNumberCharsInTitle": 80,            // 6. Character limit in title (optional)
        "maxNumberCharsInDesc": 200,            // 7. Character limit in description (optional)
        "additionalProps": []                   // 8. Additional file properties for
                                                //      this microstock (optional)
    },
    "locale": {                                 // 9. Localized strings
    }                                           //    (see "Internationalization" section)
}
- type - entity type must be
destination - name - unique name of the microstock. If several plugins implement the same microstock, their descriptions will be merged into one
- title - display name of the microstock
- icon - link to the microstock icon (usually the favicon of the microstock site)
- maxNumberKeywords - maximum number of keywords. The metadata will be automatically truncated to this amount. Number or
null. - maxNumberCharsInTitle - maximum number of characters in the title. The metadata will be automatically truncated to this amount. Number or
null. - maxNumberCharsInDesc - maximum number of characters in the description. The metadata will be automatically truncated to this amount. Number or
null. - additionalProps - additional metadata fields for this microstock. For example:
{
    // ...
    "content": {
        // ...
        "additionalProps": [
            {
                "name": "myPrice",
                "title": "Price",
                "type": "integer"    // Enter an integer
            }
        ]
    }
    // ...
}
When you select the appropriate metadata set, an additional field "Price" will appear in the additional properties section (and in the submit code it will be available under the name myPrice).

You can learn more about creating additional fields here
- locale - is used to create localized plugins that support several interface languages (see the section Internationalization)
Example my-destination.json file
{
    "type": "destination",
    "name": "my-destination",
    "title": "My destination",
    "icon": null,
    "content": {
        "maxNumberKeywords": 50
    },
    "locale": {
    }
}
# Plugin content: ftp
The structure of the FTP connection description is as follows:
{
    "type": "ftp",                              // 1. Entity type
    "name": "my-ftp",                           // 2. Service name
    "title": "My ftp",                          // 3. Display name
    "icon": "https://example.com/favicon.ico",  // 4. Icon
    "content": {
        "protocol": "ftps",
        "port": null,
        "host": "example.com",
        "formats": {
            "photo": {
                "enabled": true,
                "folder": null,
                "additional": []
            },
            "illustration": {
                "enabled": true,
                "type": "jpg",
                "folder": null,
                "previewFolder": null,
                "additional": []
            },
            "vector": {
                "enabled": true,
                "type": "zip",
                "ext": [
                    "eps"
                ],
                "folder": null,
                "previewExt": [
                    "jpg"
                ],
                "previewFolder": null,
                "additional": []
            },
            "video": {
                "enabled": true,
                "type": "video",
                "ext": [
                    "mov",
                    "mp4"
                ],
                "folder": null,
                "previewFolder": null,
                "additional": []
            }
        },
        "folder": null,
        "translitirateFilenames": true,
        "saveMplusCompat": false,
        "destinationName": "my-destination",    // 5. Microstock
        "usernameField": "email",               // 6. Login field name
        "note": {                               // 7. Additional notes
            "en": "Some additional notes",
            "ru": "Какая-то доп. подсказка"
        }
        },
    "locale": {                                 // 8. Localized strings
    }                                           //    (see "Internationalization" section)
}
- type - entity type must be
ftp - name - unique FTP connection name
- title - display name of the FTP connection
- icon - link to the FTP connection icon (usually the favicon of the microstock site)
The content field contains the FTP connection settings. There are a lot of settings, so the easiest way is to create a connection from the program interface and then click the Copy settings button in the advanced connection settings

After clicking, the settings will be copied to the clipboard. Paste the value into the content field. Pay attention only to the following fields:
- destination - microstock, to which the upload status will be attached. Use the same name you used in the description of the microstock from the previous section
- usernameField - the name of the login field. Affects only the display of the login and password entry form. The following values are available:
username- Username (default)email- Emailid- IDftpLogin- FTP login
- note - additional hint displayed to the user. Specified in several languages in the corresponding fields.
- locale - used to create localized plugins that support several interface languages (see the section Internationalization)
Example my-ftp.json file
{
    "type": "ftp",
    "name": "my-ftp",
    "title": "My ftp",
    "icon": null,
    "content": {
        "protocol": "ftps",
        "port": null,
        "host": "example.com",
        "formats": {
            "photo": {
                "enabled": true,
                "folder": null,
                "additional": []
            },
            "illustration": {
                "enabled": true,
                "type": "jpg",
                "folder": null,
                "previewFolder": null,
                "additional": []
            },
            "vector": {
                "enabled": true,
                "type": "zip",
                "ext": [
                    "eps"
                ],
                "folder": null,
                "previewExt": [
                    "jpg"
                ],
                "previewFolder": null,
                "additional": []
            },
            "video": {
                "enabled": true,
                "type": "video",
                "ext": [
                    "mov",
                    "mp4"
                ],
                "folder": null,
                "previewFolder": null,
                "additional": []
            }
        },
        "folder": null,
        "translitirateFilenames": true,
        "saveMplusCompat": false,
        "destination": "my-destination"
	},
    "locale": {
    }
}
# Plugin content: submit
The most important part is the description of the submission process. This plugin element will be displayed in the Submit section when submitting files
The structure of the submission description is as follows:
{
    "type": "submit",                           // 1. Entity type
    "name": "my-submit",                        // 2. Service name
    "title": "My Submit",                       // 3. Display name
    "description": "My description",            // 4. Description of the submission (optional)
    "icon": "https://example.com/favicon.ico",  // 5. Icon
    "content": {
        "destinationName": "my-destination",    // 6. Related microstock
        "properties": [                         // 7. Custom properties of
            // ...                              //    submission process (optional)
        ],
        "process": {                            // 8. Process description
            // ...
        },
    },
    "locale": {                                 // 9. Localized strings
    }                                           //    (see "Internationalization" section)
}
- type - entity type must be
submit - name - unique name of the submit process
- title - display title of the submit process
- description - description of the submit process (displayed when opening the list of plugin content)
- icon - link to the icon of the submit process (usually the favicon of the microstock site)
- destinationName - microstock the submit belongs to
- properties - list of submit properties. Displayed here:
To set these two fields, you need to write:
{
    // ...
    "properties": [
        {
            "name": "useDescriptionAsTitle",           // Service name
            "type": "boolean",                         // Field type
            "default": true,                           // Initial value
            "title": "Use description as asset title"  // Display name
        },
        {
            "name": "clickSubmit",
            "type": "boolean",
            "default": true,
            "title": "Click \"submit\" button",
            "tooltip": "..."                           // Tooltip
        }
    ]
    // ...
}
For more information about the format of setting fields - see the section Reference: form generation
- process - process description - see next section.
- locale - is used to create localized plugins that support several interface languages (see the section Internationalization)
# Process description
The process is described by the following structure:
{
    "title": "Submit to My destination",        // 1. Process name
    "icon": "https://example.com/favicon.ico",  // 2. Process icon
    "assetTypes": [                             // 3. Supported by the process
        "photo",                                //    files types
        "illustration",
        "vector",
        "video"
    ],
    "actions": [                                // 4. List of process steps
        // ...
    ]
}
- title - The display name of the process in the list of active processes
- icon - displayed Icon of the process in the list of active processes
- assetTypes - supported file types. An array of the following values:
photo- photosillustration- illustrationsvector- vectorsvideo- videosrelease- releasessource- sources, RAW-files
- actions - list of blocks (steps) of the process. The first block is the initial
Each process block is described by the following object:
{
    "name": "action1",         // 1. Process block name.
    "type": "actionType",      // 2. Process block type
    "title": "Step name",      // 3. Block display name (optional)
    "args": {                  // 4. Block parameters
        // ...
    },
    "pins": {                  // 5. Block output links
        "next": "action2"
        // ..
    }
}
- name - process block name. Other blocks will refer to this block by this name
- type - process block type. Different block types provide different functionality. The list of block types is presented in the section Reference: processes. One process can contain several blocks of the same type.
- title - block name displayed to the user when viewing the process log
- args - block parameters. Depending on the block type, the block may have different parameters.
- pins - output connections of the block. Specifies the name of the output and the name of the block it is connected with. The list of block outputs depends on the type of block
After the process starts, each file goes through process blocks independently of the others. When the file reaches a block with no exit specified, processing succeeds for the file. To indicate that processing of a file has failed, the special output block name @fail must be used. If you want to indicate that the user canceled the operation, use the special block name @cancel
WARNING
When developing a plugin, also keep in mind that the process can be interrupted at any time when the user closes the program. When restarted, the process will continue execution from the blocks where the files stopped last time
Consider the following example: You need to upload a file to FTP and, if the upload fails, try again after a given amount of time.
To describe this process, we need two blocks:
- upload block (type
upload) - delay block (type
delay)
The upload block contains four outputs:
- successful uploading (
next) - the file does not match the specified FTP connection requirements (
reject). For example, there is no preview of the file, and its automatic generation is turned off - error during uploading (
fail) - cancellation by the user (
cancel). Will be executed if credentials is not saved and the user refused to enter them
The delay block contains only one output (next), which the file go through after a given amount of time

In code, this process will be described as follows:
{
  "title": "My test process",
  "icon": null,
  "assetTypes": [
    "photo",
    "illustration",
    "vector",
    "video"
  ],
  "actions": [
    {
      "name": "upload1",
      "type": "upload",
      "args": {
        "connection": "my-ftp"       // FTP connection name
      },
      "pins": {
        "fail": "delay2",
        "cancel": "@cancel",
        "next": null,
        "reject": "@fail"
      }
    },
    {
      "name": "delay2",
      "type": "delay",
      "args": {
         "delay": 60                 // Delay in seconds
      },
      "pins": {
        "next": "upload1"
      }
    }
]
}
WARNING
Please note that when specifying output links, names are used but not the block types. In the example, numbers are specially added to the names of the blocks so that the difference can be seen. But you can use the type name as the block name if you like.
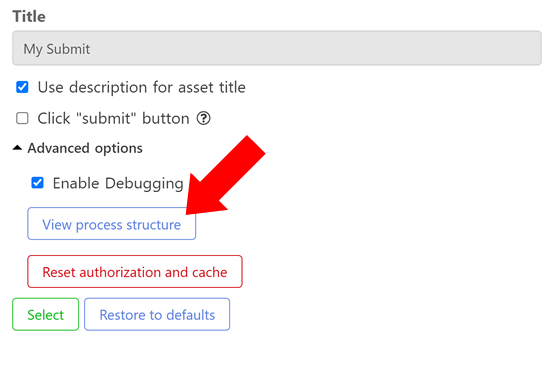
In order to see how the process you described looks like, you can use the View process structure button in the advanced settings of the submit (the button is displayed only for plugins in DEV mode)
# Example of a typical submit process
The general idea of the process was presented in first section. Now let's see how it can be implemented
A diagram of a typical process is shown in the figure below:
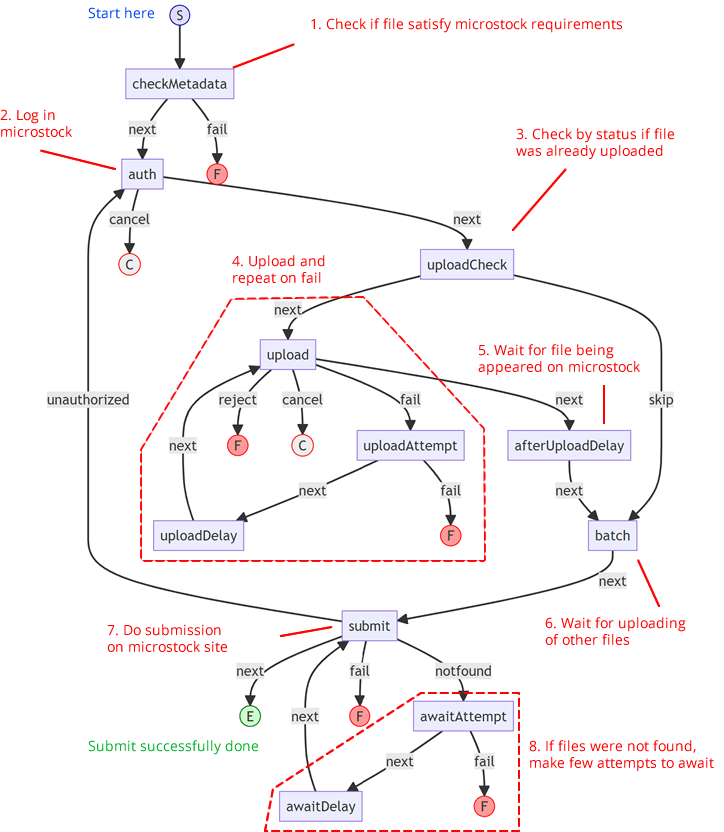
Consider step by step how to describe the code of this process
TIP
You can download the complete plugin example from the link provided in the Plugin Template section.
# 1. Check if file satisfy microstock requirements
For this, a block with type metadataFilter is used
{
    "name": "checkMetadata",
    "type": "metadataFilter",
    "args": {
        "filter": [
            "{len(meta.categories) > 0}",
            "{len(meta.keywords) >= 10}"
        ],
        "failMessage": [
            "Category is not set",
            "Too few keywords: min is 10"
        ]
    },
    "pins": {
        "next": "auth",
        "fail": "@fail"
    }
},
// ...
The block lets files go further (exit next) if they satisfy all conditions in the filter list. Otherwise, fail exit is triggered. For each of the conditions, you can set your own error text. To do this, add as many messages to the failMessage parameter as you have conditions. The first condition produces the first error text, the second condition produces the second one, and so on.
TIP
Tip: use the search filter in the program to correctly compose the verification conditions
You can read more about blocks with type metadataFilter here
# 2. Log in microstock
For authorization, a block with the browserAuth type is used
// ...
{
    "name": "auth",
    "type": "browserAuth",
    "args": {
        "targetPage": "https://example.com/contributor-page",
        "destination": "my-destination"
    },
    "pins": {
        "cancel": "@cancel",
        "next": "uploadCheck"
    }
},
// ...
The principle of its work is the following. When this block is activated, the targetPage page opens in the built-in browser. This should be some internal page of the author's personal account. Since the user is initially not authorized, the microstock site redirects the browser to the login page (this can be overridden via the loginPage argument). As soon as the user logs in and gets to the targetPage page (you can set the target link with a mask using targetPageMask), the authorization block lets files go further (exit next).
If the user changes his mind and refuses to log in, then control is transferred to the exit cancel
This scheme of work is suitable for most microstocks, but sometimes it is impossible to find out through automatic redirection that the user is not authorized. In this case, you can use another scheme, which is described here
You can read more about blocks with the browserAuth type here
# 3. Check by status if file was already uploaded
For this, a block with the uploadCheck type is used
// ...
{
    "name": "uploadCheck",
    "type": "uploadCheck",
    "args": {
        "destination": "my-destination"
    },
    "pins": {
        "next": "upload",
        "skip": "batch"
    }
},
// ...
The block checks if the file has the "Loading" status of the destination microstock. If the status is present, then the file is skipped (``skip' exit), if not, thennext` exit is activated.
You can read more about blocks with the uploadCheck type here
# 4. Upload and repeat on fail
Uploading is done using the upload block. To repeat in case of a loading error, two blocks attempt and delay are used
// ...
{
    "name": "upload",
    "type": "upload",
    "args": {
        "connection": "my-ftp"
    },
    "pins": {
        "fail": "uploadAttempt",
        "cancel": "@cancel",
        "next": "afterUploadDelay",
        "reject": "@fail"
    }
},
{
    "name": "uploadAttempt",
    "type": "attempt",
    "args": {
        "num": 3
    },
    "pins": {
        "fail": "@fail",
        "next": "uploadDelay"
    }
},
{
    "name": "uploadDelay",
    "type": "delay",
    "args": {
        "delay": 300
    },
    "pins": {
        "next": "upload"
    }
},
// ...
The upload block allows you to use the specified FTP connection (the connection parameter) to upload to the microstock. If the upload is successful, the next exit is activated. If the file is not suitable for connection, then reject is triggered. If the user canceled entering his credentials - cancel exit is used. If there was an error during upload, exit fail is activated.

In this case, to implement retry in case of an error, the upload block is connected with a block called uploadAttempt with type attempt. This block allows you to perform a given action a limited number of times. If the file entered the block no more than num times, then it exits via next, otherwise it exits via fail.
The uploadDelay block of type delay is needed to wait for a while before the next upload attempt. The delay in seconds is specified in the delay argument. After the specified time has elapsed, the next exit is triggered.
The process reference section provides detailed information about blocks upload, attempt and delay,
# 5. Wait for file being appeared on microstock
Often, after uploading a file to FTP, it does not appear in the microstock interface immediately, but after a specified amount of time. Again, a block with the delay type is useful for this.
// ...
{
    "name": "afterUploadDelay",
    "type": "delay",
    "args": {
        "delay": 90
    },
    "pins": {
        "next": "batch"
    }
},
// ...
You can read more about blocks with the delay type here
# 6. Wait for uploading of other files
In order for submission step to be performed more efficiently, it is wise to accumulate a sufficient number of files before invoking it. For this, the batch block is used
// ...
{
    "name": "batch",
    "type": "batch",
    "args": {
        "num": 5
    },
    "pins": {
        "next": "submit"
    }
},
// ...
The num argument indicates how many files need to be accumulated at this step in order to go further (next output)
You can read more about batch type blocks here
# 7. Do submission on microstock site
The most important block that implements the submit logic itself is given by a block with type browserSubmit
//...
{
    "name": "submit",
    "type": "browserSubmit",
    "args": {
        "destination": "my-destination",
        "connection": "my-ftp",
        "targetPage": "https://example.com/contributor-page",
        "submitCode": { "@textfile": "my-submit-code.js" },
        "dictionaries": { "@jsonfile": "my-submit-dict.json" }
    },
    "pins": {
        "fail": "@fail",
        "notfound": "awaitAttempt",
        "unauthorized": "auth"
    }
},
//...
The functionality of the block is to open a given page in a hidden browser and execute a given Javascript code on it.
The arguments indicate:
destination- microstock for which the submit is implemented (the user must authorize through a block with thebrowserAuthtype with the same destination value)connectionis the FTP connection with which the files were uploaded. Optional argument.targetPage- the page to be opened in the hidden browsersubmitCode- javascript code to be submitted. In this case, the code is loaded from a file using the special directive{ "@textfile": "my-submit-code.js" }. For more information on how best to organize the code, see the section Submit code (Javascript)dictionaries- additional dictionary of data to be passed in for use by thesubmitCodecode. Optional parameter. It can be used, for example, to bind IMS Studio categories to microstock categories so as not to clutter up the main code, or to pass localized strings when creating a multilingual plugin (see the [Internationalization] (./i18n.html) section). In this case, the dictionary is loaded from a file using a special directive{ "@jsonfile": "my-submit-dict.json" }
The browserSubmit block has four exits. By default, files past a block that have not been given any other status are using notfound exit. In the submitCode code, you can redirect files to the other three: next - successful submit, fail - submit error, unauthorized - authorization failed (or failed).
By default, files that pass through the next exit are assigned the submit status. You can override this behavior via the marker argument
You can read more about blocks with the browserSubmit type here
# 8. If files were not found, make few attempts to await
The retry logic in the case when the file was not found on the microstock is implemented in the same way as the upload is repeated in case of an error:
// ...
{
    "name": "awaitAttempt",
    "type": "attempt",
    "args": {
        "num": 5,
        "failMessage": "File not found"
    },
    "pins": {
        "next": "awaitDelay",
        "fail": "@fail"
    }
},
{
    "name": "awaitDelay",
    "type": "delay",
    "args": {
        "delay": 300
    },
    "pins": {
        "next": "submit"
    }
}
That's the whole description of the process. You can download the entire submit description file from the link in the Plugin Template section
# Submit code (Javascript)
The code is embedded on the microstock page using a process block of type browserSubmit. It is executed after navigating to the target page (see previous section)
As stated earlier, the code should do the following:
- find uploaded files on microstock
- upload related releases to microstock
- save files metadata on microstock
- click on the submit button
A typical code structure looks like this (read from the end):
// Get categories from dictionary passed by submit process
const CATS = submitContext.dictionaries.categories

// Check if user is authorized
async function checkAuth() {
  // [...]
  return true;
}

// Get list of not submitted files
async function getPendingFiles() {
  // [...]
  return []
}

// Find uploaded files on microstock
async function findAssets(assets) {

    // Get list of not submitted files
    const pendingFiles = await getPendingFiles();

    // Find matches
    const foundPairs = new Map();
    for (const pendingFile of pendingFiles){
        for (const asset of assets){
            if (foundPairs.has(asset)){
               continue; // Match already found for this file
            }

            // Check, if file names (without extensions) are same
            if (pendingFile.basename === asset.uploadedBasename){
                foundPairs.set(asset, pendingFile)
            }
        }
    }

    // Additionally check the list of failed uploads if possible
    // [...]

    // Return matched files
    return [...foundPairs.entries()].map(([asset, stockFile]) => {
        return {
            asset,
            stockFile
        }
    })
}

// Find already uploaded release
async function findReleaseOnStock(releaseAsset) {
    // [...]
    return null
}

const ReleasesMap = new Map(); // Releases cache
async function uploadReleases(foundAssets) {
    for (const { asset } of foundAssets){
        // Check, if file has attached releases
        if (asset.metadata.releases && asset.metadata.releases.length > 0){
            for (const releaseLink of asset.metadata.releases){
                if (ReleasesMap.has(releaseLink.assetId)){
                    continue;
                }
                // Read information about release
                const releaseAsset = await window.imshost.loadAsset(releaseLink.assetId);

                // Find release in list of already uploaded releases
                const stockReleaseId = await findReleaseOnStock(releaseAsset);

                if (stockReleaseId){
                    ReleasesMap.set(releaseLink.assetId, stockReleaseId);
                }
                else {
                    // Get main file of release
                    const releaseMainFile = releaseAsset.mainFile;

                    // Read contents of main file
                    const blob = await releaseMainFile.getBlob();

                    // Upload release
                    // [...]
                    // ReleasesMap.set(releaseLink.assetId, uploadedId)
                }
            }
        }
    }
}

// Save files metadata
async function saveAssets(foundAssets){

    const success = [];
    for (const foundAsset of foundAssets){
       // foundAsset.asset.metadata - file metadata
       // [...]
       success.push(foundAsset)
    }

    return success
}

// Do submit
async function submitAssets (savedAssets) {
    if (savedAssets.length === 0) return [];

    const success = [];
    for (const savedAsset of savedAssets){
       // [...]
       success.push(savedAsset)
    }

    return success
}

async function processAssets (assets) {
    if (assets.length === 0){
        return;
    }

    // Find uploaded files
    const foundAssets = await findAssets(assets)
    if (foundAssets.length === 0){
        return
    }

    // Upload releases
    await uploadReleases(foundAssets);

    // Save metadata
    const savedAssets = await saveAssets(foundAssets)

    // Do submit
    let doneAssets;
    if (submitContext.settings.clickSubmit){
        doneAssets = await submitAssets(savedAssets);
    }
    else doneAssets = savedAssets

    // Mark, what is done
    for (const doneAsset of doneAssets){
        const mid = doneAsset.stockFile.id
        doneAsset.asset.markDone({
            mid // save microstock file id in "submit" status
        });
    }
}

const auth = await checkAuth();
if (!auth){
    // Mark all files, that user is not authorized
    for (const asset of assets){
        asset.markUnauthorized();
    }
}
else {
    // Process files
    await processAssets(assets);
}
The input is an array of assets - the files to be sent.
Upon successful submission, you should call the asset.markDone({ mid }) method and pass the identifier assigned by the microstock to it (it will be useful later for tracking the acceptance status and obtaining sales statistics).
If an error occurs while processing a file, you can mark it as an error using the asset.markFailed(message) method, passing an error message to this method. In addition, if an unhandled exception is thrown during operation, all files that have not yet been marked with other statuses will receive the corresponding error status.
If you want to mark that a file is not found on the microstock, use the asset.markNotFound() method. The same effect will be if the file does not receive any other status when the code is already completely executed.
And finally, if it turns out that the user is not authorized (for example, this could be if the user closed the program during the submission process and started it after a long time, when the login session had already expired), you should mark the files with the asset.markUnauthorized() method .
To get the metadata stored in a file, refer to the asset.metadata property. This includes additional properties specific to this microstock.
Categories will be given as an array of strings asset.metadata.categories - identifiers of IMS Studio categories. You will need to create a dictionary to match these identifiers and microstock categories. To find out the list of all possible identifiers, refer to the section Reference: dictionaries
Releases will be specified as an asset.metadata.releases array in the following format:
{
    // Identifier by which all other data can be retrieved
    assetId: "003ded3a-d431-4118-9be3-772122e17d2d:1",
    // Display file name
    name: "Release.jpg",
    title: "Release.jpg"
}
You can get the rest of the release data by calling await window.imshost.loadAsset(releaseLink.assetId)
In addition, the submitContext object is passed to the code, which, in particular, contains the settings field - this includes the submit settings that are set when sending.
For more information about assets and submitContext, see Reference: Submit Context
To perform actions on the page, you need to send requests to the microstock server. Sample snippets for executing such requests here and here
# Debugging the submit
In order to debug the submit code, the program provides a special debugging mode. It can be enabled for submissions from plugins installed in DEV mode.
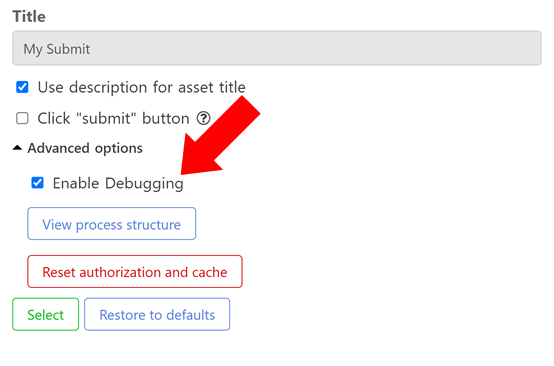
In this mode, blocks like browserSubmit will not be executed in a hidden browser, but in a new window with browser developer tools enabled. To set the first breakpoint, use the special debugger keyword.
Sometimes it happens that the developer tools open later than when debugger is executed. As a result, the breakpoint is skipped. To prevent this, you can add an additional delay at the time of debugging:
await new Promise(res => setTimeout(res, 3000)) // three second pause
debugger;                                       // call breakpoint
WARNING
As mentioned earlier, any change to the code of a plugin installed in DEV mode causes it to be reloaded. This is handy during development, but it won't affect processes that are already running. the contents of the process are saved at the time of its start. As a result, the Restart button for the process will not work, because the old version of the process will be restarted. You must start a new process for the changes to take effect.
In addition, logging can help in debugging. By default, all file transitions from one process block to another get into the file logs. In the submit code, you can also write additional messages to the file log. With the asset.log(message) function you can log a normal message, and with asset.warn(message) you can log a warning.
# Plugin Template
For a quick start, you can download a ready-made submit plugin template link
After downloading, change all the names of microstocks, FTP connections and submissions to the name of the microstock you need. Although in the example they are named differently (so that it is clear what fits where), it is better to name them the same way so as not to get confused in the future.
# Helpful Recipes
# Snippet for executing requests that return JSON
// Options:
// method - HTTP request method, such as GET or POST
// endpoint - the link where the request is sent
// params - GET request parameters
// data - sent data for POST requests. Type: key-value format object
// Returns an object
const callApi = async (method, endpoint, params = undefined, data = undefined) => {
    const params_str = params ? new URLSearchParams(params).toString() : '';
    const headers = {
        Accept: 'application/json',
         "Content-Type": 'application/json'
    };
    let body = undefined;
    if (data){
        body = JSON.stringify(data);
    }
    const response = await fetch(endpoint + (params_str ? '?' + params_str : ''), {
        method,
        headers,
        body
     })
    const obj = await response.json()
    // Change depending on how microstock throws errors
    if (obj.error) throw new Error(obj.error);
    return obj;
}
# Snippet for executing requests that return HTML
// Options:
// method - HTTP request method, such as GET or POST
// endpoint - the link where the request is sent
// params - GET request parameters
// data - sent data for POST requests. Type: FormData
// Returns a DOM document
async function callPage(method, endpoint, params = undefined, data = undefined) {
    const params_str = params ? new URLSearchParams(params).toString() : '';
    const response = await fetch(endpoint + (params_str ? '?' + params_str : ''), {
        method,
        body: data
     })
    const html = await response.text();
    const parser = new DOMParser();
    return parser.parseFromString(html, 'text/html');
}
# Alternative authorization scheme
If the simple authorization scheme described in Example of a typical submission process does not fit, you can apply a more complex one:
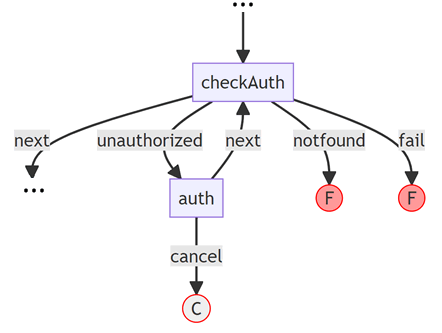
The checkAuth block executes the authorization check code using the browserSubmit block type. If the user is authorized, then the files are moved to the next block via the next link. In this case, the files do not need to be assigned any submit status, so the block's marker argument is null.
If it turned out that the user is not authorized, then the unauthorized branch is triggered and control passes to the auth block. It is important here that the block has true in the forceLogin argument, and the login link is set (the loginPage argument). This avoids looping. If the user authenticates, then control passes back to the checkAuth block to double-check that the authorization was successful.
// ...
{
    "name": "checkAuth",
    "type": "browserSubmit",
    "args": {
        "targetPage": "https://example.com/contributor-page",
        "destination": "my-destination",
        "submitCode": { "@textfile": "my-check-auth-code.js" },
        "marker": null // Don't assign any marker after passing the block
    },
    "pins":{
        "fail": "@fail",
        "notfound": "@fail",
        "unauthorized": "auth",
        "next": "checkUpload" // Substitute the name of the step after successful authorization
    }
},
{
    "name": "auth",
    "type": "browserAuth",
    "args": {
        "targetPage": "https://example.com/contributor-page",
        "loginPage": "https://example.com/login-page",
        "destination": "my-destination",
        "forceLogin": true  // Immediately open the login page
    },
    "pins": {
        "cancel": "@cancel",
        "next": "checkAuth"
    }
},
// ...